Xerox 3200MFPN User Guide - Page 55
The Scan Settings Tab, Start, Programs, All Pro, grams, ControlCentre, Settings, Phonebook, Printer - n driver download
 |
UPC - 095205731958
View all Xerox 3200MFPN manuals
Add to My Manuals
Save this manual to your list of manuals |
Page 55 highlights
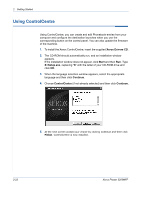
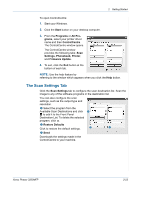
2 Getting Started To open ControlCentre: 1. Start your Windows. 2. Click the Start button on your desktop computer. 3. From the Programs or All Pro- grams, select your printer driver name and then ControlCentre. The ControlCentre window opens. The ControlCentre window provides the following tabs: Scan Settings, Phonebook, Printer, and Firmware Update. 4. To exit, click the Exit button at the bottom of each tab. NOTE: Use the help feature by referring to the window which appears when you click the Help button. The Scan Settings Tab Click the Scan Settings tab to configure the scan destination list. Scan the image to any of the software programs in the destination list. You can also configure the scan settings, such as the output type and resolution. 1 Select the program from the Available Scan Destinations and click 1 to add it to the Front Panel Destination List. To delete the selected program, click . 2 Restore Defaults Click to restore the default settings. 2 3 3 Send Downloads the settings made in the ControlCentre to your machine. Xerox Phaser 3200MFP 2-23
-
 1
1 -
2
-
3
-
4
-
5
-
6
-
7
-
8
-
9
-
10
-
11
-
12
-
13
-
14
-
15
-
16
-
17
-
18
-
19
-
20
-
21
-
22
-
23
-
24
-
25
-
26
-
27
-
28
-
29
-
30
-
31
-
32
-
33
-
34
-
35
-
36
-
37
-
38
-
39
-
40
-
41
-
42
-
43
-
44
-
45
-
46
-
47
-
48
-
49
-
 50
50 -
 51
51 -
 52
52 -
 53
53 -
 54
54 -
 55
55 -
 56
56 -
 57
57 -
 58
58 -
 59
59 -
 60
60 -
61
-
62
-
63
-
64
-
65
-
66
-
67
-
68
-
69
-
70
-
71
-
72
-
73
-
74
-
75
-
76
-
77
-
78
-
79
-
80
-
81
-
82
-
83
-
84
-
85
-
86
-
87
-
88
-
89
-
90
-
91
-
92
-
93
-
94
-
95
-
96
-
97
-
98
-
99
-
100
-
101
-
102
-
103
-
104
-
105
-
106
-
107
-
108
-
109
-
110
-
111
-
112
-
113
-
114
-
115
-
116
-
117
-
118
-
119
-
120
-
121
-
122
-
123
-
124
-
125
-
126
-
127
-
128
-
129
-
130
-
131
-
132
-
133
-
134
-
135
-
136
-
137
-
138
-
139
-
140
-
141
-
142
-
143
-
144
-
145
-
146
-
147
-
148
-
149
-
150
-
151
-
152
-
153
-
154
-
155
-
156
-
157
-
158
-
159
-
160
-
161
-
162
-
163
-
164
-
165
-
166
-
167
-
168
-
169
-
170
-
171
-
172
-
173
-
174
-
175
-
176
-
177
-
178
-
179
-
180
-
181
-
182
-
183
-
184
-
185
-
186
-
187
-
188
-
189
-
190
-
191
-
192
-
193
-
194
-
195
-
196
-
197
-
198
-
199
-
200
-
201
-
202
-
203
-
204
-
205
-
206
-
207
-
208
-
209
-
210
-
211
-
212
-
213
-
214
-
215
-
216
-
217
-
218
-
219
-
220
-
221
-
222
-
223
-
224
-
225
-
226
-
227
-
228
-
229
-
230
-
231
-
232
-
233
-
234
-
235
-
236
 |
 |
