Xerox Z750/N Setup Guide - Page 10
Using the Tektronix Installer
 |
UPC - 042215455084
View all Xerox Z750/N manuals
Add to My Manuals
Save this manual to your list of manuals |
Page 10 highlights
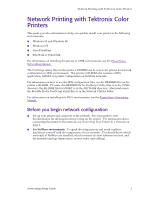
Using the Tektronix Installer Using the Tektronix Installer Tektronix Installer for Windows The Tektronix installer for Windows is on your printer's software CD-ROM. A single integrated installer is used to install printer drivers and other software. The Tektronix installer automatically performs printer installation tasks and creates a printer. In most cases, you are required only to make a few installation choices, clicking Next to move from screen to screen. Each installer screen provides text that describes the choices for that screen. If you are unsure about which choice to make, click the name of the item to highlight it, then read the explanation in the Description field. To make your choices, check the boxes for the desired items and click Next to continue. Running the installer from the printer's CD-ROM 1. Insert the printer's software CD-ROM into the CD-ROM drive. I If the Windows autorun feature is enabled, the CD-ROM launches automatically. I If the Windows autorun feature is disabled, double-click My Computer, then double click the CD icon to launch the CD-ROM. 2. Click Install Printer Driver. 3. Follow the on-screen instructions to complete the installation. Running the installer from the printer's hard disk You can run the installer from the printer's optional hard disk, if one is installed. This method requires that you already have a TCP/IP connection to the printer. 1. Connect to your printer via PhaserLink (see Accessing the printer from a browser on page 33). 2. Scroll to the bottom of the PhaserLink Status page. In the LINKS group, click Install Drivers. Networking Setup Guide 5
-
 1
1 -
2
-
3
-
4
-
 5
5 -
 6
6 -
 7
7 -
 8
8 -
 9
9 -
 10
10 -
 11
11 -
 12
12 -
 13
13 -
 14
14 -
 15
15 -
16
-
17
-
18
-
19
-
20
-
21
-
22
-
23
-
24
-
25
-
26
-
27
-
28
-
29
-
30
-
31
-
32
-
33
-
34
-
35
-
36
-
37
-
38
-
39
-
40
-
41
-
42
-
43
-
44
-
45
-
46
-
47
-
48
-
49
-
50
-
51
-
52
-
53
 |
 |
