Yamaha CDR-HD1300 Owner's Manual - Page 19
GETTING STARTED, Connecting a monitor, Connecting the power cable - software
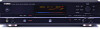 |
View all Yamaha CDR-HD1300 manuals
Add to My Manuals
Save this manual to your list of manuals |
Page 19 highlights
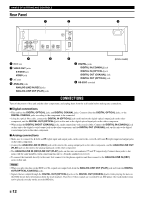
GETTING STARTED CONNECTIONS I Connecting a monitor • You can display the list of groups or tracks to be played, copying/recording settings or the list of setting items on the monitor by connecting the monitor to this unit. Connect the S VIDEO jack or the VIDEO jack whichever available on your monitor. • Use a commercially available S-video cable to connect the S VIDEO jack on this unit and the S-video input jack on the monitor. • Use an included video pin cable to connect the VIDEO jack on this unit and the composite video jack on the monitor. • Arrow marks (©) in the illustration below indicate the direction of the audio signal. Monitor DVD player, cable TV tuner, etc DIGITAL OUTPUT Coaxial cable (optional) COAXIAL VIDEO IN S VIDEO VIDEO L L R R 4 REC PLAY 3 LINE IN - LINE OUT ANALOG Audio pin cable (included) Audio pin cable (included) REC PLAY L L R OUT R IN S video cable (optional) VIDEO OUT S VIDEO VIDEO COAXIAL OPTICAL COAXIAL OPTICAL IN OUT DIGITAL RS-232C *RS-232C terminal Optical cable (one included) DIGITAL INPUT COAXIAL OPTICAL **Coaxial cable OPTICAL Video pin cable (included) (U.S.A. model) To wall outlet DIGITAL OUTPUT Amplifier or receiver *This terminal is for connection of the personal computer. Information about the connection software is to be announced on the YAMAHA website (see page 93). **For U.S.A. model, one coaxial cable with ferrite core is included. Be sure to connect to the DIGITAL OUT (COAXIAL) jack with this cable, directing the side with ferrite core to this unit. I Connecting the power cable Plug the power cable into the AC inlet when all connections are complete, and then plug in the power cable to the wall outlet. [Europe, U.K. and Australia models] Plug in this unit to the wall outlet. English E-13
-
 1
1 -
2
-
3
-
4
-
5
-
6
-
7
-
8
-
9
-
10
-
11
-
12
-
13
-
 14
14 -
 15
15 -
 16
16 -
 17
17 -
 18
18 -
 19
19 -
 20
20 -
 21
21 -
 22
22 -
 23
23 -
 24
24 -
25
-
26
-
27
-
28
-
29
-
30
-
31
-
32
-
33
-
34
-
35
-
36
-
37
-
38
-
39
-
40
-
41
-
42
-
43
-
44
-
45
-
46
-
47
-
48
-
49
-
50
-
51
-
52
-
53
-
54
-
55
-
56
-
57
-
58
-
59
-
60
-
61
-
62
-
63
-
64
-
65
-
66
-
67
-
68
-
69
-
70
-
71
-
72
-
73
-
74
-
75
-
76
-
77
-
78
-
79
-
80
-
81
-
82
-
83
-
84
-
85
-
86
-
87
-
88
-
89
-
90
-
91
-
92
-
93
-
94
-
95
-
96
-
97
-
98
-
99
-
100
-
101
-
102
-
103
-
104
-
105
-
106
 |
 |
