Yamaha CDR-HD1300 Owner's Manual - Page 61
Disc Divide, EDITING, Editing during playback, Editing during the stop mode
 |
View all Yamaha CDR-HD1300 manuals
Add to My Manuals
Save this manual to your list of manuals |
Page 61 highlights
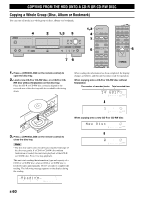
EDITING I Editing during playback 1. Select and confirm "Disc Combine" in step 2 of "Editing during playback" on page 52. The disc being played is confirmed to be the first disc in the combination. The number of the disc being played and the number of the disc to be the last in the combination appear on the display. 001 G -002 L dB -30 -10 -6 -2 0 R GROUP Disc being played Disc to be the last in the combination 2. Select the disc to be the last in the combination by rotating the MULTI JOG knob (pressing +/- on the remote control). 3. Press the MULTI JOG knob (ENTER on the remote control) to confirm the disc to be the last in the combination. Press CLEAR to cancel the confirmed selection. 4. Press COMPLETE. The two selected discs and all those between are combined into one disc. Playback resumes from the beginning of the combined disc. Cautions • One disc can contain up to 99 tracks. When the total track number on a disc exceeds 99, "Track No.Full" appears on the display. • The maximum length of one disc on the HDD is 99 minutes 59 seconds. When the total time of the discs to be combined exceeds 99 minutes 59 seconds, "No Enough Spc" appears on the display. Notes • When combining a series of discs, the selected disc numbers following the selected first disc will be available for future use. • The disc title for the first disc is effective for the combined disc. DISC EDITING Disc Divide You can divide a disc into two at the selected point. I Editing during the stop mode 1. Select and confirm "Disc Divide" in step 5 of "Editing during the stop mode" on page 52. The following message appears on the display. Divide 001? L dB -30 -10 -6 -2 0 R GROUP Disc to be divided The number of the disc to be divided flashes. 2. Select the disc to be divided by rotating the MULTI JOG knob (pressing +/- on the remote control). 3. Press the MULTI JOG knob (ENTER on the remote control) to confirm the disc to be divided. "Div.from" and the dividing point (the number of the track to be the first after dividing) appear on the display. Div. from 4? L dB -30 -10 -6 -2 0 R TRACK Track to be the first after dividing Press CLEAR to cancel the confirmed selection. 4. Select the dividing point by rotating the MULTI JOG knob (pressing +/- on the remote control). 5. Press the MULTI JOG knob (ENTER on the remote control) to confirm the dividing point. Press CLEAR to cancel the confirmed selection. 6. Press COMPLETE. The selected disc is divided into two at the selected dividing point. This unit returns to the editing menu item selection. Continues to next page English E-55
-
 1
1 -
2
-
3
-
4
-
5
-
6
-
7
-
8
-
9
-
10
-
11
-
12
-
13
-
14
-
15
-
16
-
17
-
18
-
19
-
20
-
21
-
22
-
23
-
24
-
25
-
26
-
27
-
28
-
29
-
30
-
31
-
32
-
33
-
34
-
35
-
36
-
37
-
38
-
39
-
40
-
41
-
42
-
43
-
44
-
45
-
46
-
47
-
48
-
49
-
50
-
51
-
52
-
53
-
54
-
55
-
 56
56 -
 57
57 -
 58
58 -
 59
59 -
 60
60 -
 61
61 -
 62
62 -
 63
63 -
 64
64 -
 65
65 -
 66
66 -
67
-
68
-
69
-
70
-
71
-
72
-
73
-
74
-
75
-
76
-
77
-
78
-
79
-
80
-
81
-
82
-
83
-
84
-
85
-
86
-
87
-
88
-
89
-
90
-
91
-
92
-
93
-
94
-
95
-
96
-
97
-
98
-
99
-
100
-
101
-
102
-
103
-
104
-
105
-
106
 |
 |
