Yamaha CDR-HD1300 Owner's Manual - Page 82
Playback
 |
View all Yamaha CDR-HD1300 manuals
Add to My Manuals
Save this manual to your list of manuals |
Page 82 highlights
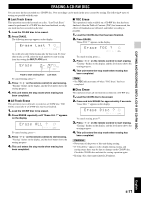
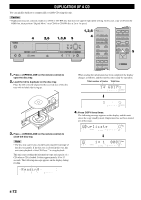
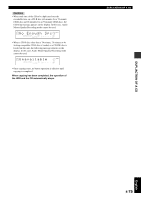
PLAYBACK This unit can play back tracks recorded on the 2 types of recording media; HDD and CD. Press HDD to play tracks recorded on the HDD, and press CDR to play tracks recorded on a CD (including a CD-R and a CD-RW disc). Playing a CD Playing Tracks on the HDD ER COPY A.M.Q.R. TEXT/TIME MODE MULTI JOG PUSH ENTER MENU TRACK NO. COMPLETE CLEAR BOOKMARK DIGITAL REC LEVEL REC FINALIZE ERASE INPUT OPTICAL COAXIAL ANALOG ANALOG REC LEVEL MIN MAX 2 1,2 3,4 5 1,2 OPEN/CLOSE COPY TIMER REC REC A.M.Q.R. FINALIZE ERASE TRACK NO. TEXT/TIME INPUT WRITE MODE MENU COMPLETE CLEAR ENTER 1 ABC 2 DEF 3 GHI 4 JKL 5 MNO 6 PQR 7 STU 8 VWX 9 YZ 0 SPACE +10 SYMBOL BOOKMARK REPEAT RANDOM INTRO GROUP SKIP HDD CDR 4 3,4 5 4 JKL 5 MNO 6 PQR 7 STU 8 VWX 9 YZ 0 SPACE +10 SYMBOL BOOKMARK REPEAT RANDOM NTRO 1. Press v (OPEN/CLOSE on the remote control) to open the disc tray. 2. Load the CD to be played on the disc tray and close the disc tray by pressing v (OPEN/CLOSE on the remote control). This unit starts reading the disc information. "Reading" flashes on the display during reading. 3. Start playback. When w/d (w on the remote control) is pressed, this unit starts playback from the beginning of the first track. 1 001 L dB -30 -10 -6 -2 0 R TOC GROUP CD 4. Press w/d (d on the remote control) to stop playback temporarily. Press w/d (w or d on the remote control) to resume playback. 5. Press a to stop playback. ER COPY A.M.Q.R. 1 TEXT/TIME MODE MULTI JOG PUSH ENTER MENU TRACK NO. COMPLETE CLEAR BOOKMARK DIGITAL REC LEVEL REC FINALIZE ERASE INPUT OPTICAL COAXIAL ANALOG ANALOG REC LEVEL MIN MAX 4 JKL 5 MNO 6 PQR 7 STU 8 VWX 9 YZ 0 SPACE +10 SYMBOL BOOKMARK REPEAT RANDOM INTRO 2,3 GROUP SKIP HDD CDR 1 3 2,3 4 4 1. Make sure that the GROUP indicator lights up, then rotate the MULTI JOG knob (press GROUP SKIP q or GROUP SKIP w on the remote control) to select a group (disc, album, or bookmark) to be played. 2. Start playback. When w/d (w on the remote control) is pressed, this unit starts playback from the beginning of the first track of the selected group. Dsc001 G 1 001 L dB -30 -10 -6 -2 0 R GROUP 3. Press w/d (d on the remote control) to stop playback temporarily. Press w/d (w or d on the remote control) to resume playback. 4. Press a to stop playback. IMPORTANT • Never turn off the power of this unit during the playback. The data on the HDD may be damaged. • During the playback, make sure that this unit is not subjected to shock or vibration as the HDD may be damaged. E-76
-
 1
1 -
2
-
3
-
4
-
5
-
6
-
7
-
8
-
9
-
10
-
11
-
12
-
13
-
14
-
15
-
16
-
17
-
18
-
19
-
20
-
21
-
22
-
23
-
24
-
25
-
26
-
27
-
28
-
29
-
30
-
31
-
32
-
33
-
34
-
35
-
36
-
37
-
38
-
39
-
40
-
41
-
42
-
43
-
44
-
45
-
46
-
47
-
48
-
49
-
50
-
51
-
52
-
53
-
54
-
55
-
56
-
57
-
58
-
59
-
60
-
61
-
62
-
63
-
64
-
65
-
66
-
67
-
68
-
69
-
70
-
71
-
72
-
73
-
74
-
75
-
76
-
 77
77 -
 78
78 -
 79
79 -
 80
80 -
 81
81 -
 82
82 -
 83
83 -
 84
84 -
 85
85 -
 86
86 -
 87
87 -
88
-
89
-
90
-
91
-
92
-
93
-
94
-
95
-
96
-
97
-
98
-
99
-
100
-
101
-
102
-
103
-
104
-
105
-
106
 |
 |
