Yamaha CDR-HD1300 Owner's Manual - Page 62
Disc Pack, Div. from, Pack ?
 |
View all Yamaha CDR-HD1300 manuals
Add to My Manuals
Save this manual to your list of manuals |
Page 62 highlights
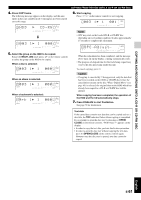
DISC EDITING I Editing during playback 1. Select and confirm "Disc Divide" in step 2 of "Editing during playback" on page 52. The disc being played is confirmed to be divided. "Div.from" and the dividing point (the number of the track to be the first after dividing) appear on the display. Div. G from 4? L dB -30 -10 -6 -2 0 R TRACK Track to be the first after dividing 2. Select the dividing point by rotating the MULTI JOG knob (pressing +/- on the remote control). 3. Press the MULTI JOG knob (ENTER on the remote control) to confirm the dividing point. Press CLEAR to cancel the confirmed selection. 4. Press COMPLETE. The disc being played is divided into two at the set dividing point. Playback resumes from the beginning of the second disc of the two divided discs. Caution • The HDD can contain up to 999 discs. If the HDD already contains 999 discs, "Disc No.Full" appears on the display. Note • The disc numbers following the divided disc will be up-numbered by one. However, if there is any unused disc number, only the discs up to that number will be up-numbered. Before "Disc Divide" is performed 1 2 4 5 6 Disc Pack You can re-organize the disc numbers by eliminating unused disc numbers that have been created by changing disc numbers or erasing discs. 1. Select and confirm "Disc Pack" in step 5 of "Editing during the stop mode" on page 52. The following message appears on the display. Pack ? L dB -30 -10 -6 -2 0 R 2. Press COMPLETE. The disc numbers are re-organized by eliminating unused disc numbers. This unit returns to the editing menu item selection. Before "Disc Pack" is performed 1 3 4 6 1 2 3 4 5 6 After "Disc Pack" has been performed (Unused disc numbers have been eliminated.) : Unused disc numbers Divided into two 1 2 3 4 5 6 After "Disc Divide" has been performed (dividing a disc into two) : Space not being used E-56
-
 1
1 -
2
-
3
-
4
-
5
-
6
-
7
-
8
-
9
-
10
-
11
-
12
-
13
-
14
-
15
-
16
-
17
-
18
-
19
-
20
-
21
-
22
-
23
-
24
-
25
-
26
-
27
-
28
-
29
-
30
-
31
-
32
-
33
-
34
-
35
-
36
-
37
-
38
-
39
-
40
-
41
-
42
-
43
-
44
-
45
-
46
-
47
-
48
-
49
-
50
-
51
-
52
-
53
-
54
-
55
-
56
-
 57
57 -
 58
58 -
 59
59 -
 60
60 -
 61
61 -
 62
62 -
 63
63 -
 64
64 -
 65
65 -
 66
66 -
 67
67 -
68
-
69
-
70
-
71
-
72
-
73
-
74
-
75
-
76
-
77
-
78
-
79
-
80
-
81
-
82
-
83
-
84
-
85
-
86
-
87
-
88
-
89
-
90
-
91
-
92
-
93
-
94
-
95
-
96
-
97
-
98
-
99
-
100
-
101
-
102
-
103
-
104
-
105
-
106
 |
 |
