Yamaha CDR-HD1300 Owner's Manual - Page 85
Selecting Tracks Using On-Screen, Display OSD, Listening with Headphones, PLAYBACK, Select a group
 |
View all Yamaha CDR-HD1300 manuals
Add to My Manuals
Save this manual to your list of manuals |
Page 85 highlights
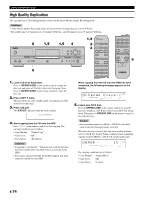
PLAYBACK Selecting Tracks Using On-ScreenDisplay (OSD) You can display a list of groups and tracks to be played by connecting this unit to a monitor. If you display the list on a screen, it is much easier to see than on the display. Note • When "VIDEO Output" on the system utility is set to OFF, no OSD signals will be output. Set it to ON to have an on-screendisplay (see page 87). I Select a group 1. Press the MULTI JOG knob to turn on the GROUP indicator. L dB -30 -10 -6 -2 0 R GROUP The following list will be displayed on a monitor. Grp Tr. 1 Dsc 1: AAAAA Dsc 2: BBBBB Dsc 3: CCCCC Alb 1: MY BEST Alb 2: MY BEST 2 Mark : [Bookmark] 0:00 2. Rotate the MULTI JOG knob (press +/- on the remote control) to select a group. The selected group indicator will be in reverse video. PLAYBACK I Select a track 1. Press the MULTI JOG knob to turn on the TRACK indicator. L dB -30 -10 -6 -2 0 R TRACK The following list will be displayed on a monitor. Grp Tr. 9 1- Aaaaa 2- Bbbbb 3- Ccccc 4- Ddddd 5- Eeeee 6- Fffff 7- Ggggg 8- Hhhhh 9- Iiiii 10- Jjjjj 11- Kkkkk 0:00 2. Rotate the MULTI JOG knob (press +/- on the remote control) to select a group. The selected group indicator will be in reverse video. Note • The track with a bookmark has *(asterisk) added in front of the track number. Listening with Headphones Connect your headphones to the PHONES jack and adjust the volume with the LEVEL control. NATURAL SOUND HDD/CD RECORDER POWER PHONES LEVEL MIN MAX HDD CDR COPY A.M.Q.R. REC Adjust the headphones volume Connect your headphones Caution • If the power of other components such as an amplifier connected to this unit is not turned on, the sound of this unit may be distorted. If this occurs, use the headphones with the other component's power turned on. English E-79
-
 1
1 -
2
-
3
-
4
-
5
-
6
-
7
-
8
-
9
-
10
-
11
-
12
-
13
-
14
-
15
-
16
-
17
-
18
-
19
-
20
-
21
-
22
-
23
-
24
-
25
-
26
-
27
-
28
-
29
-
30
-
31
-
32
-
33
-
34
-
35
-
36
-
37
-
38
-
39
-
40
-
41
-
42
-
43
-
44
-
45
-
46
-
47
-
48
-
49
-
50
-
51
-
52
-
53
-
54
-
55
-
56
-
57
-
58
-
59
-
60
-
61
-
62
-
63
-
64
-
65
-
66
-
67
-
68
-
69
-
70
-
71
-
72
-
73
-
74
-
75
-
76
-
77
-
78
-
79
-
 80
80 -
 81
81 -
 82
82 -
 83
83 -
 84
84 -
 85
85 -
 86
86 -
 87
87 -
 88
88 -
 89
89 -
 90
90 -
91
-
92
-
93
-
94
-
95
-
96
-
97
-
98
-
99
-
100
-
101
-
102
-
103
-
104
-
105
-
106
 |
 |
