Yamaha CP50 Owner's Manual - Page 12
Group buttons [A] to [D], USB TO DEVICE port - demo
 |
UPC - 086792936963
View all Yamaha CP50 manuals
Add to My Manuals
Save this manual to your list of manuals |
Page 12 highlights
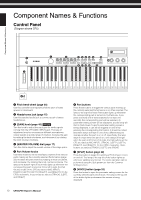
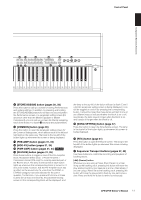
Component Names & Functions Control Panel [ 33] (Fast Forward) button Whenever you are using a Preset Drum Pattern or a User Song as the backing track, pressing this button will move the play position forward by one measure at a time. Alternatively, if you are using a Wave file as the backing track, pressing this button will move the play position forward by one second at a time. Press and hold the button to fast-forward continuously. [+] (Stop) button This button is used to stop recording or playback. [3/,] (Play / Pause) button This button is used to start recording or playback. In addition, if playback is underway, this button can be pressed to pause it. Pressing this button when recording is underway ends the recording. Display Using the display, you can confirm system messages, set parameters, and perform a range of other operations. Knobs 1 to 3 (page 27) Numbered 1 to 3 from left to right, these knobs can be turned to control the parameters assigned to them. On each different parameter setting page, furthermore, a different set of parameters or operations is assigned to the knobs, and they can be turned or pressed to set the parameters or perform the operations. " [-PAGE] and [PAGE3] buttons (page 19) Press these left and right buttons within a parameter setting screen that comprises a number of different pages in order to navigate between them. # [EXIT/jump to edit] button (pages 21, 34) Press this button to return to the Performance screen from the parameter setting screen for the currently selected block (page 31), from the Utility screen, or from the File screen. Furthermore, by pressing the [PRE-AMP] button, the [MODFX] button, the [PWR-AMP] button, the [REVERB] button, the [MASTER COMPRESSOR] button, or a part button while holding down the [EXIT/jump to edit] button, you can jump directly to the corresponding parameter setting screen. You can also press the [STORE/ASSIGN] button while holding down the [EXIT/jump to edit] button to call up the screen for assigning parameters to Knobs 1 to 3. $ [ENTER] button Press this button to register settings and perform a range of other operations. % [UTILITY] button Press this button to call up the Utility screen. The lamp to the top-left of the button lights up whenever this screen is being displayed. In addition, you can hold down the [UTILITY] button and press the [FILE] button (or vice versa) to open the Demo Song screen. & [FILE] button (page 52) Press this button to call up the File screen. ' Number buttons [1] to [10] Press the Number buttons to select different Performances within the currently-selected memory bank. The number of the currently selected Performance is indicated by lighting of the lamp to the top-left of the corresponding button. When this lamp flashes, meanwhile, it will indicate that selection of a new Performance has started but not yet been completed. Furthermore, whenever a parameter setting screen comprising a number of different pages is displayed, the Number buttons can also be used to jump quickly to the corresponding page. At this time, the currently selected page is indicated by flashing of the lamp to the top-left of the corresponding button. ( Bank buttons Press the [PRE], [USER], or [EXT] button to select the Preset Performance memory area, the User Performance memory area, or an External Performance memory area, respectively. Each of these areas comprises three individual memory banks - for example, PRE1, PRE2, and PRE3 in the case of the Preset Performance memory area. You can select these banks by pressing the corresponding button ([PRE], [USER], or [EXT]) as many times as required. Furthermore, you can also jump directly to the first bank in the selected area - namely, PRE1, USR1, or EXT1 - by holding down the [EXIT] button and pressing the corresponding Bank button. When the lamp to the top-left of a Bank button flashes, it will indicate that selection of a new Performance has started but not yet been completed. ) Group buttons [A] to [D] Press the [A], [B], [C], or [D] button to select the corresponding group within the current Performance memory bank. When the lamp to the top-left of a Group button flashes, it will indicate that selection of a new Performance has started but not yet been completed. Furthermore, whenever a parameter setting screen comprising a number of different pages is displayed, the Group buttons can also be used to jump quickly to the corresponding page. At this time, the currently selected page is indicated by flashing of the lamp to the top-left of the corresponding button. * [TRANSPOSE] button (page 30) Press this button to call up the Transpose screen. The lamp to the top-left of the button lights up whenever this screen is being displayed. + [MASTER COMPRESSOR] button (pages 30, 31, 36) Press this button to toggle the Master Compressor on and off. The lamp to the top-left of the button lights up whenever this block is activated. Furthermore, if you press and hold this button (for at least one second), the Master Compressor's parameter setting screen will be displayed, and the lamp will begin to flash. Even if this parameter setting screen is being displayed, the Master Compressor can still be toggled on and off by pressing the button. It should be noted that the [MASTER COMPRESSOR] button's lamp will flash in one of two different ways to indicate whether the block is on or off; specifically, the lamp stays lit longer when the block is on, and it stays off longer when the block is off. , [MASTER EQUALIZER] knobs (page 30) Turn these knobs to adjust the tone of all sound output by your CP5 or CP50. The CP5 features five knobs for adjusting the gain in individual frequency bands - namely, the [LOW], [LOW MID], [MID], [HIGH MID], and [HIGH] knobs. Meanwhile, the CP50 has three such knobs - [LOW], [MID], and [HIGH]. The same adjustments can be performed using the corresponding parameters from the Utility screen. (See the Reference Manual pdf document for more details.) - USB TO DEVICE port (page 25) CP5 only USB flash-memory devices can be plugged into the CP5 via this port. 12 CP5/CP50 Owner's Manual
-
 1
1 -
2
-
3
-
4
-
5
-
6
-
 7
7 -
 8
8 -
 9
9 -
 10
10 -
 11
11 -
 12
12 -
 13
13 -
 14
14 -
 15
15 -
 16
16 -
 17
17 -
18
-
19
-
20
-
21
-
22
-
23
-
24
-
25
-
26
-
27
-
28
-
29
-
30
-
31
-
32
-
33
-
34
-
35
-
36
-
37
-
38
-
39
-
40
-
41
-
42
-
43
-
44
-
45
-
46
-
47
-
48
-
49
-
50
-
51
-
52
-
53
-
54
-
55
-
56
-
57
-
58
-
59
-
60
-
61
-
62
-
63
-
64
-
65
-
66
-
67
-
68
 |
 |
