Yamaha CVP-600 Owner's Manual - Page 111
Select the desired voices and accompaniment, style, etc., Start recording.
 |
View all Yamaha CVP-600 manuals
Add to My Manuals
Save this manual to your list of manuals |
Page 111 highlights
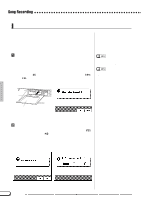
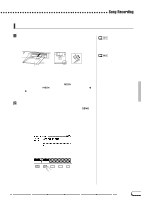
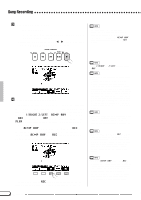
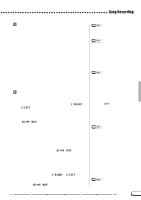
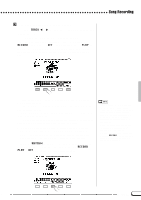
Song Recording BSelect the desired voices and accompaniment style, etc...Select the voices and accompaniment style and set the tempo in the normal way, and other settings needed. (If you want to try out the selected voices, style and tempo, etc., make sure to do so before entering the SONG PLAY mode, since the recording will start as soon as you play the keyboard or press the [START/STOP] button.) When Using Style File Disks • When using Style File disks, make sure to load the data from the Style File disk (page 80) before inserting the disk for recording. • The Auto Accompaniment functions - INTRO, AUTO FILL, ENDING, and FADE IN/OUT - can be also recorded. Press the INTRO button before starting to record, press the AUTO FILL button during recording, press the ENDING button at the end of recording, and press the FADE IN/OUT button at the beginning or ending of the recording. When the ENDING button or the FADE IN/OUT button is pressed at the ending, recording stops automatically after playing the ending pattern or fade out. NStart recording There are several ways to start recording, as described below. • Recording your keyboard performance (1/RIGHT or 2/LEFT) Start playing the keyboard or press the [PLAY/STOP] button. • Recording the Auto Accompaniment or rhythm (ACMP&RHY) Start playing the keyboard (in the left range when the keyboard is split) with the Synchronized Start function or press the [START/STOP] button. • Recording your keyboard performance together with the Auto Accompaniment or rhythm Start recording in the same way as described in "Recording the Auto Accompaniment or rhythm (ACMP&RHY)" above to start recording your keyboard performance together with the Auto Accompaniment or rhythm. • Recording the Auto Accompaniment or rhythm in the middle of recording your keyboard performance Start recording your keyboard performance as in "Recording your keyboard performance (1/RIGHT or 2/LEFT)" above, then start recording the Auto Accompaniment or rhythm while you play as described in "Recording the Auto Accompaniment or rhythm (ACMP&RHY)" above. Recording Along with the Metronome 1. After selecting the voice, press the [METRO- NOME] button, and set the Beat parameter in the METRONOME display. ¡ The metronome will start sounding. 2. The recording starts as soon as you play the keyboard. The metronome sound is not recorded. When a disk is not inserted... • A song can be recorded to internal memory if it is short enough. A maximum of approximately 2500 notes 25KB can be recorded; however, this amount may be less if other functions are used. The internally recorded song will be deleted when the power is turned off or when another song is loaded. See "Recording Without a Disk" (page 127) for more information. Adjusting the Volume During Recording • During recording, you can adjust the volume of the recorded Auto Accompaniment and/or keyboard part from the [ACMP/SONG VOLUME] control and the MIXER display. When entering the record mode, [ACMP/SONG VOLUME] is automatically reset to the default value (MAX), regardless of the current slider position. Turning Harmony or Split On/Off During Recording • When recording the 1/RIGHT part, [HAR- MONY] or [SPLIT] can be set to on and recorded for only this part. When the 2/LEFT part is selected, the Harmony sound and the left range of the split cannot be recorded. When the recording part is changed, [HARMONY] and [SPLIT] are automatically turned off. • The keyboard guide lamps do not light up during recording. CVP-98/96/600 109 109
-
 1
1 -
2
-
3
-
4
-
5
-
6
-
7
-
8
-
9
-
10
-
11
-
12
-
13
-
14
-
15
-
16
-
17
-
18
-
19
-
20
-
21
-
22
-
23
-
24
-
25
-
26
-
27
-
28
-
29
-
30
-
31
-
32
-
33
-
34
-
35
-
36
-
37
-
38
-
39
-
40
-
41
-
42
-
43
-
44
-
45
-
46
-
47
-
48
-
49
-
50
-
51
-
52
-
53
-
54
-
55
-
56
-
57
-
58
-
59
-
60
-
61
-
62
-
63
-
64
-
65
-
66
-
67
-
68
-
69
-
70
-
71
-
72
-
73
-
74
-
75
-
76
-
77
-
78
-
79
-
80
-
81
-
82
-
83
-
84
-
85
-
86
-
87
-
88
-
89
-
90
-
91
-
92
-
93
-
94
-
95
-
96
-
97
-
98
-
99
-
100
-
101
-
102
-
103
-
104
-
105
-
 106
106 -
 107
107 -
 108
108 -
 109
109 -
 110
110 -
 111
111 -
 112
112 -
 113
113 -
 114
114 -
 115
115 -
 116
116 -
117
-
118
-
119
-
120
-
121
-
122
-
123
-
124
-
125
-
126
-
127
-
128
-
129
-
130
-
131
-
132
-
133
-
134
-
135
-
136
-
137
-
138
-
139
-
140
-
141
-
142
-
143
-
144
-
145
-
146
-
147
-
148
-
149
-
150
-
151
-
152
-
153
-
154
-
155
-
156
-
157
-
158
-
159
-
160
-
161
-
162
-
163
-
164
 |
 |
