Yamaha CVP-600 Owner's Manual - Page 74
Record the selected part., Quantize the recorded part, if necessary.
 |
View all Yamaha CVP-600 manuals
Add to My Manuals
Save this manual to your list of manuals |
Page 74 highlights
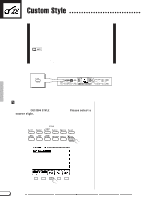
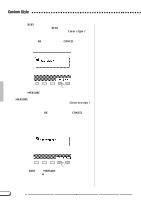
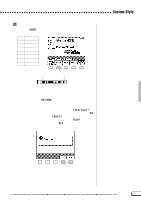
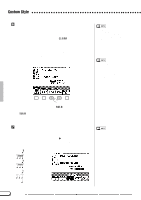
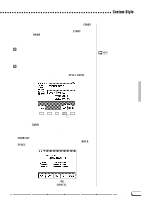
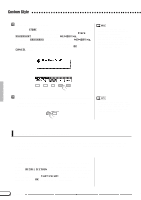
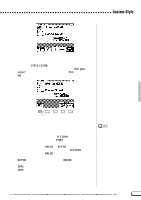
Custom Style NRecord the selected part You can now add new parts to the selected part by playing the keyboard at the appropriate timing (play in C Major seventh since the Custom Style is recorded as a C Major seventh pattern). If you want to create a totally new part from scratch, press the CLEAR LCD button to clear the selected part before beginning to record. If both the R1 and R2 parts are cleared the metronome will sound to provide a timing guide (the metronome sound is not recorded). When a drum kit voice is used, a single drum instrument sound can be cleared from the R1 or R2 part by pressing the key corresponding to the instrument to be cleared while holding the keyboard "C1" key. The metronome timing guide can also be cleared in this way. • Playback can be started and stopped via the [START/STOP] button as required while in the Custom Style mode - data cannot be recorded while playback is stopped. • The timing guide will stop as soon as the Custom Style is stored. • The sound of all parts is automatically stopped at the end of the style - i.e. at the point between repeats when recording. It is therefore not advisable to record over this point. Another useful recording aid is the SOLO LCD button: when this button is pressed and highlighted, only the selected part will sound. Press the SOLO button again to turn the solo function off and hear the entire style. MQuantize the recorded part, if necessary You can "tighten up" the timing of a recorded part by aligning all notes to specified beats via the PART QUANTIZE function in CUSTOM STYLE display page 2 (press the PAGE [>] button). Press the LCD button below the note symbol to select "quantize size" - i.e. the beats to which the notes in the current part will be aligned: • Quantization can also be applied to the already recorded part. 32nd notes 3 16th note triplets 16th notes 3 8th note triplets 8th notes 3 quarter-note triplets quarter notes 72 CVP-98/96/600 72
-
 1
1 -
2
-
3
-
4
-
5
-
6
-
7
-
8
-
9
-
10
-
11
-
12
-
13
-
14
-
15
-
16
-
17
-
18
-
19
-
20
-
21
-
22
-
23
-
24
-
25
-
26
-
27
-
28
-
29
-
30
-
31
-
32
-
33
-
34
-
35
-
36
-
37
-
38
-
39
-
40
-
41
-
42
-
43
-
44
-
45
-
46
-
47
-
48
-
49
-
50
-
51
-
52
-
53
-
54
-
55
-
56
-
57
-
58
-
59
-
60
-
61
-
62
-
63
-
64
-
65
-
66
-
67
-
68
-
 69
69 -
 70
70 -
 71
71 -
 72
72 -
 73
73 -
 74
74 -
 75
75 -
 76
76 -
 77
77 -
 78
78 -
 79
79 -
80
-
81
-
82
-
83
-
84
-
85
-
86
-
87
-
88
-
89
-
90
-
91
-
92
-
93
-
94
-
95
-
96
-
97
-
98
-
99
-
100
-
101
-
102
-
103
-
104
-
105
-
106
-
107
-
108
-
109
-
110
-
111
-
112
-
113
-
114
-
115
-
116
-
117
-
118
-
119
-
120
-
121
-
122
-
123
-
124
-
125
-
126
-
127
-
128
-
129
-
130
-
131
-
132
-
133
-
134
-
135
-
136
-
137
-
138
-
139
-
140
-
141
-
142
-
143
-
144
-
145
-
146
-
147
-
148
-
149
-
150
-
151
-
152
-
153
-
154
-
155
-
156
-
157
-
158
-
159
-
160
-
161
-
162
-
163
-
164
 |
 |
