Yamaha PSR-I500 PSR-I500 Owners Manual - Page 36
Loading a Sample from a USB Flash Drive, LoadSMPL, Del SMPL
 |
View all Yamaha PSR-I500 manuals
Add to My Manuals
Save this manual to your list of manuals |
Page 36 highlights
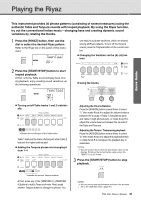
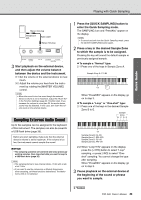
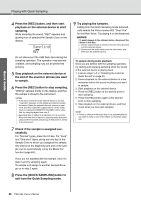
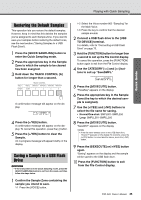
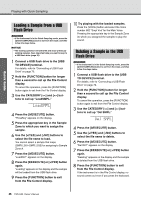
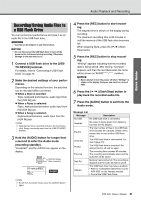
Quick Guide Playing with Quick Sampling Loading a Sample from a USB Flash Drive IMPORTANT • If the instrument is in the Quick Sampling mode, press the [QUICK SAMPLING] button to exit from the mode, and then follow the steps below. NOTICE • The loading operation will overwrite and erase previously existing samples. Save important data you want to keep to a USB flash drive (page 35). 1 Connect a USB flash drive to the [USB TO DEVICE] terminal. For details, refer to "Connecting a USB Flash Drive" on page 72. 2 Hold the [FUNCTION] button for longer than a second to call up the File Control display. To cancel the operation, press the [FUNCTION] button again to exit from the File Control display. 3 Use the CATEGORY [] buttons to call up "LoadSMPL." LoadSMPL 4 Press the [0/EXECUTE] button. "PressKey" appears on the display. 5 Press the appropriate key in the Sample Zone to which you want to assign the sample. 6 Use the [+/YES] and [-/NO] buttons to select the file name to load. You cannot select a sample that loops (SMPLL001-SMPLL250) for assigning to Sample Zone A. 7 Press the [0/EXECUTE] button. "LoadOK?" appears on the display. 8 Press the [0/EXECUTE] or [+/YES] button again. "Loading" appears on the display and the sample will be loaded from the USB flash drive. 9 Press the [FUNCTION] button to exit from the File Control display. 10 Try playing with the loaded samples. Press the [VOICE] button and select the Voice number 802 "Smpl Vce" for the Main Voice. Pressing the appropriate key in the Sample Zone (to which you assigned the sample) to play the sound. Deleting a Sample in the USB Flash Drive IMPORTANT • If the instrument is in the Quick Sampling mode, press the [QUICK SAMPLING] button to exit from the mode, and then follow the steps below. 1 Connect a USB flash drive to the [USB TO DEVICE] terminal. For details, refer to "Connecting a USB Flash Drive" on page 72. 2 Hold the [FUNCTION] button for longer than a second to call up the File Control display. To cancel the operation, press the [FUNCTION] button again to exit from the File Control display. 3 Use the CATEGORY [] buttons to call up "Del SMPL." Del SMPL 4 Press the [0/EXECUTE] button. 5 Use the [+/YES] and [-/NO] buttons to select the file name to delete. 6 Press the [0/EXECUTE] button. "Del OK?" appears on the display. 7 Press the [0/EXECUTE] or [+/YES] button again. "Deleting" appears on the display and the sample is deleted from the USB flash drive. 8 Press the [FUNCTION] button to exit from the File Control display. If the instrument is in the File Control display, no sound comes out even if you press the keyboard. 36 PSR-I500 Owner's Manual
-
 1
1 -
2
-
3
-
4
-
5
-
6
-
7
-
8
-
9
-
10
-
11
-
12
-
13
-
14
-
15
-
16
-
17
-
18
-
19
-
20
-
21
-
22
-
23
-
24
-
25
-
26
-
27
-
28
-
29
-
30
-
 31
31 -
 32
32 -
 33
33 -
 34
34 -
 35
35 -
 36
36 -
 37
37 -
 38
38 -
 39
39 -
 40
40 -
 41
41 -
42
-
43
-
44
-
45
-
46
-
47
-
48
-
49
-
50
-
51
-
52
-
53
-
54
-
55
-
56
-
57
-
58
-
59
-
60
-
61
-
62
-
63
-
64
-
65
-
66
-
67
-
68
-
69
-
70
-
71
-
72
-
73
-
74
-
75
-
76
-
77
-
78
-
79
-
80
-
81
-
82
-
83
-
84
-
85
-
86
-
87
-
88
 |
 |
