Yamaha RX-V496 Owner's Manual
Yamaha RX-V496 Manual
 |
View all Yamaha RX-V496 manuals
Add to My Manuals
Save this manual to your list of manuals |
Yamaha RX-V496 manual content summary:
- Yamaha RX-V496 | Owner's Manual - Page 1
U C A RX-V496 Natural Sound AV Receiver Ampli-tuner audio-vidéo OWNER'S MANUAL MODE D'EMPLOI - Yamaha RX-V496 | Owner's Manual - Page 2
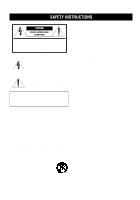
to persons. The exclamation point within an equilateral triangle is intended to alert you to the presence of important operating and maintenance (servicing) instructions in the literature accompanying the appliance. WARNING TO REDUCE THE RISK OF FIRE OR ELECTRIC SHOCK, DO NOT EXPOSE THIS UNIT TO - Yamaha RX-V496 | Owner's Manual - Page 3
Code, ANSI/NFPA 70, provides information with regard to proper grounding of the mast and supporting instructions contained in this manual, meets FCC requirements. Modifications not expressly approved by Yamaha and "ON", please try to eliminate the problem by using one of the following measures: - Yamaha RX-V496 | Owner's Manual - Page 4
not use force on switches, controls or connection wires. When moving fire or other accidents. YAMAHA will not be held such as tuners, receivers and TVs. Move Be sure to read the "TROUBLESHOOTING" section regarding common operating errors of the unit. Retain this Owner's Manual in a safe place for - Yamaha RX-V496 | Owner's Manual - Page 5
Remote Control with Preset Manufacturer Codes SOUND FIELD PROGRAM 25 TUNING 28 RECORDING A SOURCE ON TAPE, MD OR VIDEO CASSETTE 32 ADVANCED OPERATION SET MENU 33 DELAY TIME AND SPEAKER OUTPUT LEVELS 37 SLEEP TIMER 39 PRESET REMOTE CONTROL 40 APPENDIX TROUBLESHOOTING 47 SPECIFICATIONS - Yamaha RX-V496 | Owner's Manual - Page 6
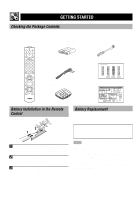
loop antenna Connection guide Battery Installation in the Remote Control 2 1 3 1 Turn the remote control over and slide Replace all the batteries with new ones. Be sure to replace the batteries within about two minutes. If it takes longer than two minutes, the codes preset for the remote control - Yamaha RX-V496 | Owner's Manual - Page 7
the infrared sensor during operation. When the sensor is covered or there is a large object between the remote control and the sensor, the sensor cannot receive signals. The sensor may not be able to receive signals properly when it is exposed to direct sunlight or a strong artificial light (such as - Yamaha RX-V496 | Owner's Manual - Page 8
quantity of power to receive infrared-signals from the remote control. 2 Remote control sensor This receives signals from the remote control. 3 Display This shows Turn this control to turn up or down the volume. 7 PHONES jack Connect the headphones to the PHONES jack. You can listen to the sound to - Yamaha RX-V496 | Owner's Manual - Page 9
DECODER INPUT terminals. e BALANCE This control is only effective for the sound from the main speakers. Turn the control to adjust the balance of the output Press this button to switch the tuning mode between automatic and manual. To use the automatic tuning method, press this button so that the "AUTO - Yamaha RX-V496 | Owner's Manual - Page 10
CONTROLS on. 7 x indicator " x " lights up when the built-in digital sound field processor is on. 8 MEMORY indicator This flashes for about five seconds after tuning mode. 0 STEREO indicator This lights up when an FM stereo broadcast with sufficient signal strength is being received. q Signal-level - Yamaha RX-V496 | Owner's Manual - Page 11
you want to control with the remote control. (The proper code must be set for your component. Refer to "Setup codes" on page 45 To select a preset station number (1 to 8) 6 MUTE Press this button to mute the sound. To cancel mute, press this button again. 7 VOLUME These buttons are used to adjust - Yamaha RX-V496 | Owner's Manual - Page 12
sound plus the effect sounds. They will probably be the speakers from your present stereo system. The rear speakers are used for the effect and surround sounds, and the center speaker is for the center sounds YAMAHA Active Servo Processing Subwoofer System is ideal for natural If this problem occurs, - Yamaha RX-V496 | Owner's Manual - Page 13
and "-" to "-". Some components require different connection methods and have different terminal names. Refer to the instructions for each component to be connected to this unit. When you connect other YAMAHA audio components (such as a tape deck, MD recorder and CD player or changer), connect it - Yamaha RX-V496 | Owner's Manual - Page 14
The indoor FM antenna is only a simple antenna. For reception with better sound quality, installing the outdoor FM antenna (commercially available) is recommended. Note • buildings and mountains, etc.). Consult your dealer or authorized service center and be sure to install an antenna that suits - Yamaha RX-V496 | Owner's Manual - Page 15
INTRODUCTION PREPARATION s AM loop antenna (included) AM loop antenna s Connecting the AM loop antenna 1 3 2 4 5 Antenna stand s Outdoor AM antenna Vinyl covered wire (5 m to 10 m) CONNECTIONS The AM loop antenna can be removed from the stand and attached to a wall, etc. However, note that - Yamaha RX-V496 | Owner's Manual - Page 16
an MM or high-output MC cartridge. If you have a turntable with a low-output MC cartridge, use an inline boosting transformer or MC head amplifier when connecting to these terminals. y Connecting the ground (earth) wire of the turntable to the GND terminal will normally minimize hum, but in some - Yamaha RX-V496 | Owner's Manual - Page 17
them from dust. • If your LD player has a Dolby Digital RF signal output terminal, be sure to use the RF demodulator (separately purchased). • No sound will be heard when connecting your LD player's Dolby Digital RF signal output terminal directly to this unit's COAXIAL DVD/LD digital signal input - Yamaha RX-V496 | Owner's Manual - Page 18
output terminals of the decoder to the EXTERNAL DECODER INPUT terminals of this unit. Notes • When a source connected to these terminals is selected, the digital sound field processor cannot be used. • The settings of "CENTER SP", "REAR SP", "MAIN SP" and "BASS OUT" in the SET MENU have no effect on - Yamaha RX-V496 | Owner's Manual - Page 19
connection If you have a subwoofer with builtin amplifier, including the YAMAHA Active Servo Processing Subwoofer System, connect the input red) and "-" (black) properly. If the connections are faulty, no sound will be heard from the speakers, and if the polarity of the speaker connections is - Yamaha RX-V496 | Owner's Manual - Page 20
CONNECTIONS s Speaker cables 10 mm (3/8") 1 Remove approx. 10 mm (3/8") of insulation from each of the speaker cable. 2 Twist the exposed wires of the cable together to prevent short circuits. s Connecting to the MAIN SPEAKERS terminals Red: positive (+) Black: negative (-) 2 1 3 1 Unscrew the - Yamaha RX-V496 | Owner's Manual - Page 21
OUTLETS Australia model 1 OUTLET Use these outlets to connect the power cords from your components to this unit. The power to the AC OUTLET(S) is controlled by this unit's STANDBY/ON (or POWER). These outlets will supply power to any connected component whenever this unit is turned on. The maximum - Yamaha RX-V496 | Owner's Manual - Page 22
DTS decoder. Before You Start Adjusting 2 1 Using the Test Tone The adjustment of each speaker sound output level should be performed at your listening position with the remote control. After completing the adjustments, use VOLUME (u/d) at your listening position to check if the adjustments are - Yamaha RX-V496 | Owner's Manual - Page 23
have completed the adjustments, you can only adjust the overall volume level of your audio system by using VOLUME (or VOLUME (u/d)). • If there is insufficient sound output from the center and rear speakers, you may decrease the main speaker output level by setting "MAIN LVL" in the SET MENU to "-10 - Yamaha RX-V496 | Owner's Manual - Page 24
Front panel or Remote control 6 2 4 7 1 Set VOLUME to the "m" position. 2 Turn the power on. Front panel Front panel or Remote control 3 Press play back result will be a video image from the video source and the sound from the audio source selected by using TAPE/MD MON / EXT. DECODER ( - Yamaha RX-V496 | Owner's Manual - Page 25
instructions for the source component (and page 28 for details about tuning). Note • When controlling an audio/video component (tape deck, MD recorder, CD player, DVD/LD player, etc.) with the remote control panel Remote control PLAYING A SOURCE s To mute the sound Press MUTE on the remote control. - Yamaha RX-V496 | Owner's Manual - Page 26
is shown on the display. or Front panel Remote control Notes • Set the input mode to AUTO to play a DVD/LD source encoded with Dolby Digital. • Set the input mode to ANALOG to play a normal 2-channel source with a Dolby Surround program. • The sound output may be interrupted for some LD and DVD - Yamaha RX-V496 | Owner's Manual - Page 27
ANALOG while playing a source encoded with a DTS signal, this unit reproduces no sound. • If you play an LD source encoded with DTS and set the input the decoder automatically switches to the appropriate setting and reproduces 5.1 channel sound. • If the LD player is transmitting signals by a non- - Yamaha RX-V496 | Owner's Manual - Page 28
speakers) Press EFFECT to cancel the sound effect and monitor only the main sound. Press EFFECT again to turn the sound effect back on. Front panel or Notes Remote control • If the sound effect is canceled when Dolby Digital or DTS is decoding, the sounds of all channels are mixed and output - Yamaha RX-V496 | Owner's Manual - Page 29
Pro Logic decoding, Dolby Digital decoding or DTS decoding and digital sound field processing are precisely performed without altering the original sound orientation. The surround effect produced by the sound field folds around the viewer naturally from the rear to the right and left and toward the - Yamaha RX-V496 | Owner's Manual - Page 30
of video source encoded with Dolby Surround, Dolby Digital or DTS (especially large-scale movie productions). Clearly reproduces dialog and sound effects in the latest sound form of science fiction films, thus creating a broad and expansive cinematic space amid the silence. You can enjoy science - Yamaha RX-V496 | Owner's Manual - Page 31
1 SOUND FIELD PROGRAM FEATURES This program is designed specifically to enhance monaural sources. Compared to a strictly mono setting, the sound image a movie in a popular Dolby Stereo theater. s Dolby Digital or DTS + 3 digital sound fields Digital sound fields are created in the presence zone - Yamaha RX-V496 | Owner's Manual - Page 32
stop at the desired station (because the signal from the station is weak). • When tuned in to a station, the frequency of the received station is shown on the display. Manual Tuning 1 Use INPUT SELECTOR to select the tuner as the input source. 2 Press FM/AM to select the reception band (FM or - Yamaha RX-V496 | Owner's Manual - Page 33
30. Notes • A new setting can be stored in place of the former one. • You can manually replace a preset station with another FM or AM station by simply using the manual preset tuning method. • Even if the number of received stations is not enough to be stored up to E8, automatic preset tuning is - Yamaha RX-V496 | Owner's Manual - Page 34
with the reception band, frequency and signal strength information. or Front panel Remote control 6 Repeat steps 1 to 5 to store other stations. Notes • A new setting can be stored in place of the former one. • The reception mode (stereo or monaural) is stored along with the station frequency. 30 - Yamaha RX-V496 | Owner's Manual - Page 35
INTRODUCTION PREPARATION Exchanging Preset Stations You can exchange the assignment of two preset stations with each other. s Example: If you want to exchange preset station "E1" with "A5". 2,4 - + - + L R 1 Recall preset station "E1". Refer to the procedure in the section "To Recall a - Yamaha RX-V496 | Owner's Manual - Page 36
instructions for these components. 2 1,4 - + - + L R 4 2 y If a tape deck or MD recorder is being used for recording, you can monitor the sounds panel 2 Select the source you want to record. or Front panel Remote control 3 Begin recording by the tape deck, MD recorder or VCR connected - Yamaha RX-V496 | Owner's Manual - Page 37
item appears on the display. 3 Press + or - repeatedly to adjust the setting. Adjusting Items in the SET MENU Adjustments should be performed with the remote control while watching the information on the display. 1 3 2 4 Repeat steps 2 and 3 to adjust the setting of any other item in the same way - Yamaha RX-V496 | Owner's Manual - Page 38
SET MENU Description of Each Item 1. CENTER SP Choices: LRG (Large)/SML (Small)/NONE Preset position: LRG (Large) LRG (Large) Select this position if your center speaker is approximately the same size as the main speakers. In this position, fullrange signals on the center channel are directed to the - Yamaha RX-V496 | Owner's Manual - Page 39
modified. 6. D.D. LFE (Adjusting the output level of the LFE channel for Dolby Digital) Control range: -20 dB to 0 dB (in 1 dB steps) Preset value: 0 condition of your listening environment, it may not be possible to increase the sound output to a level as high as that in a movie theater. However, - Yamaha RX-V496 | Owner's Manual - Page 40
other signals can be adjusted. 9. CNTR DELAY (Adjusting the delay of the center sound) Control range: 0 ms to 5 ms (in 1 ms steps) Preset value: 0 ms DTS contains center channel signals. This adjusts the delay between the main sound (on the main channels) and dialog, etc. (on the center channel). - Yamaha RX-V496 | Owner's Manual - Page 41
to all DSP programs. Notes • Adding too much delay will cause an unnatural effect with some sources. • The sound is momentarily interrupted while adjusting the delay time. Program Control range (ms) Preset value 1. PRO LOGIC/Normal 15 to 30 20 DOLBY DIGITAL/Normal 0 to 15 5 DTS - Yamaha RX-V496 | Owner's Manual - Page 42
DELAY TIME AND SPEAKER OUTPUT LEVELS Adjusting Method Adjustments should be performed with the remote control while watching the information on the display. 1 3 2 1 Press AMP(TUNER) on the component selector. 3 Press + or - to adjust the delay time or speaker output levels. 4 - Yamaha RX-V496 | Owner's Manual - Page 43
before SLEEP is pressed.) Note • The SLEEP timer can also be canceled by setting the unit in the standby mode by using POWER on the remote control (or STANDBY/ON), or by disconnecting the AC power cord from the AC power outlet. Flashes 3 The "SLEEP" indicator soon lights up on the display - Yamaha RX-V496 | Owner's Manual - Page 44
the DVD/LD and DVD MENU modes. The code for a YAMAHA DVD player is factory set. If the remote control does not operate your YAMAHA DVD player, you need to set the code number "0048". TAPE/MD The code for a YAMAHA tape deck is factory set. (The code for the YAMAHA MD recorder can also be set.) VCR - Yamaha RX-V496 | Owner's Manual - Page 45
unit on if you have set the code for a YAMAHA tape deck. This button turns on the tape deck that has a remote control with a power button if you have set the code for another manufacturer. (MD) This do not function. Refer to the instructions for details of each component. 41 APPENDIX English - Yamaha RX-V496 | Owner's Manual - Page 46
unit on if you have set the code for a YAMAHA CD player. This button turns on the CD player that has a remote control with a power button if you have set the code for another manufacturer. VOLUME MUTE SLEEP p shaded buttons do not function. Refer to the instructions for details of each component. 42 - Yamaha RX-V496 | Owner's Manual - Page 47
DVD/LD. POWER (DVD) This button turns this unit on if you have set the code for a YAMAHA DVD player. This button turns on the DVD player that has a remote control with a power button if you have set the code for another manufacturer. (LD) This button turns this unit on if you have set the - Yamaha RX-V496 | Owner's Manual - Page 48
PRESET REMOTE CONTROL s VCR MODE Note • TV VOLUME, TV INPUT and TV SLEEP function if you have set the code for your TV. s CBL/SAT MODE Note • TV VOLUME, TV INPUT and TV SLEEP function if you have set the code for your TV. VCR POWER VCR CHANNEL +/- VOLUME MUTE TV SLEEP VCR REC Press - Yamaha RX-V496 | Owner's Manual - Page 49
does not flash, repeat step 3 and re-enter the code. 5 Press POWER (or any other button) on the remote control to check if you have set the code correctly. If your component cannot be controlled with the remote control, try setting another code for the same manufacturer. Notes • You can set only - Yamaha RX-V496 | Owner's Manual - Page 50
PRESET REMOTE CONTROL s Returning to the factory-set codes To return all components to the factory-set codes, Code TV Satellite tuner VCR DVD player CD player Tape deck 0101 0006 0002 0008 (YAMAHA DVD player) 0005 (YAMAHA CD player) 0004 (YAMAHA Tape deck) We recommend that you write all the code - Yamaha RX-V496 | Owner's Manual - Page 51
TROUBLESHOOTING power cord and contact your authorized YAMAHA dealer or service center. s General SYMPTOM The unit Dolby Surround, Dolby Digital or DTS. The sound output level of the center speaker is set . Connect the cables properly. If the problem persists, the cables may be defective. Adjust - Yamaha RX-V496 | Owner's Manual - Page 52
" to the OFF position. Refer to page 34 - 12, 13 12 12 - 32 13 36 s Tuner SYMPTOM FM stereo reception is noisy. CAUSE The characteristics of FM stereo broadcasts may cause this problem when the transmitter is too far away or the antenna input is poor. There is distortion, and clear reception - Yamaha RX-V496 | Owner's Manual - Page 53
type of fluorescent lamp, etc.) is striking the remote control sensor of this unit. The batteries are weak. The component to be controlled has not been selected. The manufacturer's code has not been set properly. REMEDY Reposition the unit. Replace all batteries with new ones. Press one of the - Yamaha RX-V496 | Owner's Manual - Page 54
kHz 55 dB • Signal-to-Noise Ratio (Mono/Stereo) DIN 75 dB/69 dB IHF 81 dB/75 dB • Harmonic Distortion (1 kHz) Mono/Stereo 0.1/0.2% • Stereo Separation (1 kHz 48 dB • Frequency Response 20 and Canada models only Remote control Batteries Specifications are subject to change without notice. 50 - Yamaha RX-V496 | Owner's Manual - Page 55
sound orientation by digital sound processing provides listeners with excitement and realism that have never been experienced before. s DTS (Digital Theater System) Digital Surround DTS was developed to replace . However, YAMAHA DSP technology allows you to create nearly the same sound experience as - Yamaha RX-V496 | Owner's Manual - Page 56
(background video) function 21 C Canceling sound effect 24 CINEMA DSP 27, 51 Connections Manual preset tuning 30 R Recording 32 Remote control Basic operations 7 Batteries 2 Component selector 7, 40 Factory-set code 46 Manufacturer's codes .......... i (at the end of this manual) Setup codes - Yamaha RX-V496 | Owner's Manual - Page 57
LIST OF MANUFACTURER'S CODES LISTES DES CODES FABRICANT TV A-Mark 1161 A Tandy 0941 Abex 1151 Admira 1141 Adventura 1131 Aiko 1121 Akai 0331, 1101, 1111 Alba 0431 Alleron 1091 Ambassador 1081 Amstrad - Yamaha RX-V496 | Owner's Manual - Page 58
0541, 0581, 0591, 0601, 0611, 0771, 0781, 0791, 0861, 0971, 0991, 1031, 1091, 1111, 1771 Watson 1001 Xogego 1611, 1621, 1661, 1741, 1761 Yamaha 0221, 0361, 0571, 1031, 1111, 1141, 1381 Yoko 1001 Zenith 0011, 0041, 0891, 0991, 1771 Zonda 1161 ii CABLE ABC 0256, 0376 Antronix - Yamaha RX-V496 | Owner's Manual - Page 59
0088 0008, 0048 LD PLAYER Aiwa Denon Disco Vision Funai Hitachi (E) Kenwood Magnavox Marantz Mitsubishi NAD Panasonic Philips Pioneer RCA Realistic Sharp Sony Victor Yamaha 0157 0147 0017 0157 0017 0087, 0107 0027 0027 0137 0137 0077, 0177 0027 0037, 0017, 0137 0167 0157 0127 0047, 0057, 0117 - Yamaha RX-V496 | Owner's Manual - Page 60
ELECTRONIQUE FRANCE S.A. RUE AMBROISE CROIZAT BP70 CROISSY-BEAUBOURG 77312 MARNE-LA-VALLEE CEDEX02, FRANCE YAMAHA ELECTRONICS (UK) LTD. YAMAHA HOUSE, 200 RICKMANSWORTH ROAD WATFORD, HERTS WD1 7JS, ENGLAND YAMAHA SCANDINAVIA A.B. J A WETTERGRENS GATA 1, BOX 30053, 400 43 VÄSTRA FRÖLUNDA, SWEDEN - Yamaha RX-V496 | Owner's Manual - Page 61
Quick Reference Card AMP(TUNER) TAPE/MD CD DVD/LD POWER A/B/C/D/E TEST VOLUME MUTE SLEEP +/- TIME LEVEL POWER Input selector buttons EFFECT PRESET+/- TV VOLUME VOLUME MUTE SLEEP TV INPUT REC/PAUSE PRG+, PRG- PLAY DIR A (TAPE) SKIP- (MD) SET REWIND (TAPE) MENU SEARCH (MD) POWER Input - Yamaha RX-V496 | Owner's Manual - Page 62
Quick Reference Card DVD MENU VCR CBL/SAT TV POWER DISC SKIP+/- VOLUME MUTE RETURN MENU SELECT MENU LEFT TITLE VCR POWER Numeric buttons CLEAR +10 VCR CHANNEL+/- VOLUME TV VOLUME MUTE INDEX TV SLEEP TV INPUT MENU UP VCR REC*1 VCR PLAY MENU RIGHT MENU MENU DOWN VCR REWIND CBL/SAT - Yamaha RX-V496 | Owner's Manual - Page 63
-
 1
1 -
 2
2 -
 3
3 -
 4
4 -
 5
5 -
 6
6 -
 7
7 -
8
-
9
-
10
-
11
-
12
-
13
-
14
-
15
-
16
-
17
-
18
-
19
-
20
-
21
-
22
-
23
-
24
-
25
-
26
-
27
-
28
-
29
-
30
-
31
-
32
-
33
-
34
-
35
-
36
-
37
-
38
-
39
-
40
-
41
-
42
-
43
-
44
-
45
-
46
-
47
-
48
-
49
-
50
-
51
-
52
-
53
-
54
-
55
-
56
-
57
-
58
-
59
-
60
-
61
-
62
-
63
 |
 |

OWNER’S MANUAL
MODE D’EMPLOI
RX-V496
Natural Sound AV Receiver
Ampli-tuner audio-vidéo
U C A