Yamaha RX-V496 Owner's Manual - Page 20
Speaker cables, Connecting to the MAIN SPEAKERS terminals, Tighten the knob to secure the wire.
 |
View all Yamaha RX-V496 manuals
Add to My Manuals
Save this manual to your list of manuals |
Page 20 highlights
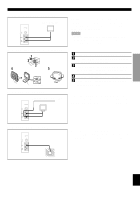
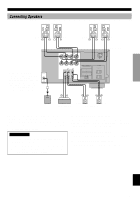
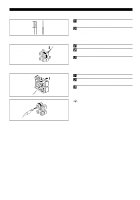
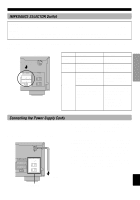
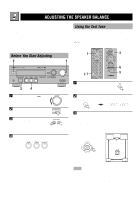
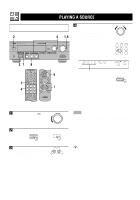
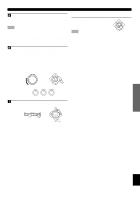
CONNECTIONS s Speaker cables 10 mm (3/8") 1 Remove approx. 10 mm (3/8") of insulation from each of the speaker cable. 2 Twist the exposed wires of the cable together to prevent short circuits. s Connecting to the MAIN SPEAKERS terminals Red: positive (+) Black: negative (-) 2 1 3 1 Unscrew the knob. 2 Insert one bare wire into the hole in the side of each terminal. 3 Tighten the knob to secure the wire. s Connecting to the REAR and CENTER SPEAKERS terminals Red: positive (+) Black: negative (-) 31 2 1 Open the tab. 2 Insert one bare wire into the hole of each terminal. 3 Return the tab to secure the wire. y Banana plug connections are also possible. Simply insert the banana plug connector into the corresponding terminal. 16
-
 1
1 -
2
-
3
-
4
-
5
-
6
-
7
-
8
-
9
-
10
-
11
-
12
-
13
-
14
-
 15
15 -
 16
16 -
 17
17 -
 18
18 -
 19
19 -
 20
20 -
 21
21 -
 22
22 -
 23
23 -
 24
24 -
 25
25 -
26
-
27
-
28
-
29
-
30
-
31
-
32
-
33
-
34
-
35
-
36
-
37
-
38
-
39
-
40
-
41
-
42
-
43
-
44
-
45
-
46
-
47
-
48
-
49
-
50
-
51
-
52
-
53
-
54
-
55
-
56
-
57
-
58
-
59
-
60
-
61
-
62
-
63
 |
 |

16
■
Speaker cables
1
Remove approx. 10 mm (3/8”) of insulation
from each of the speaker cable.
2
Twist the exposed wires of the cable together
to prevent short circuits.
■
Connecting to the MAIN SPEAKERS terminals
1
Unscrew the knob.
2
Insert one bare wire into the hole in the side of
each terminal.
3
Tighten the knob to secure the wire.
■
Connecting to the REAR and CENTER SPEAKERS terminals
1
Open the tab.
2
Insert one bare wire into the hole of each
terminal.
3
Return the tab to secure the wire.
y
Banana plug connections are also possible. Simply insert the
banana plug connector into the corresponding terminal.
CONNECTIONS
10 mm (3/8”)
2
1
3
Red: positive (+)
Black: negative (–)
2
3
1
Red: positive (+)
Black: negative (–)