Yamaha RX-V496 Owner's Manual - Page 23
Press Time/level, Center, R Sur. Or
 |
View all Yamaha RX-V496 manuals
Add to My Manuals
Save this manual to your list of manuals |
Page 23 highlights
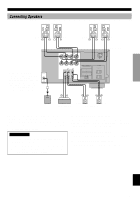
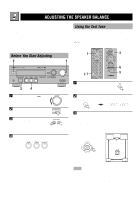
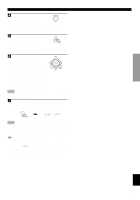
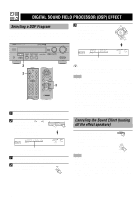
INTRODUCTION PREPARATION 4 Adjust BALANCE on the front panel so that the sound output level of the right main speaker and the left main speaker is the same. 5 Press TIME/LEVEL repeatedly to select the speaker to be adjusted. "CENTER", "R SUR." or "L SUR." appears on the display. 6 Press + to raise and - to lower the level. Adjust the sound output levels of the center speaker and the rear speakers so that they become almost the same as that of the main speakers. While adjusting, the test tone is heard from the selected speaker. L R Front panel Note • You cannot adjust the delay time while the test tone is being heard even if "DELAY" appears on the display. 7 When the adjustment is complete, press TEST. "TEST OFF" appears on the display and the test tone stops. Note • If "CENTER SP" in the SET MENU is set to the NONE position, the sound output level of the center speaker cannot be adjusted in step 6. The center channel sound is automatically output from the right and left main speakers. y • Once you have completed the adjustments, you can only adjust the overall volume level of your audio system by using VOLUME (or VOLUME (u/d)). • If there is insufficient sound output from the center and rear speakers, you may decrease the main speaker output level by setting "MAIN LVL" in the SET MENU to "-10 dB". (Refer to page 35 for details.) ADJUSTING THE SPEAKER BALANCE BASIC OPERATION ADVANCED OPERATION APPENDIX English 19
-
 1
1 -
2
-
3
-
4
-
5
-
6
-
7
-
8
-
9
-
10
-
11
-
12
-
13
-
14
-
15
-
16
-
17
-
 18
18 -
 19
19 -
 20
20 -
 21
21 -
 22
22 -
 23
23 -
 24
24 -
 25
25 -
 26
26 -
 27
27 -
 28
28 -
29
-
30
-
31
-
32
-
33
-
34
-
35
-
36
-
37
-
38
-
39
-
40
-
41
-
42
-
43
-
44
-
45
-
46
-
47
-
48
-
49
-
50
-
51
-
52
-
53
-
54
-
55
-
56
-
57
-
58
-
59
-
60
-
61
-
62
-
63
 |
 |
