ZyXEL NBG-416N User Guide - Page 56
Setting your NBG-416N to Client Bridge Mode - how to set password
 |
View all ZyXEL NBG-416N manuals
Add to My Manuals
Save this manual to your list of manuals |
Page 56 highlights
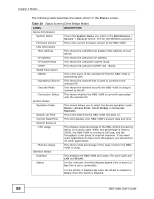
Chapter 4 Modes Table 23 Menu: Universal Repeater Mode (continued) LINK TAB FUNCTION Advanced This screen allows you to configure advanced wireless settings. QoS Use this screen to configure Wi-Fi Multimedia Quality of Service (WMM QoS). WMM QoS allows you to prioritize wireless traffic according to the delivery requirements of individual services. WPS Use this screen to configure WPS. WPS Station Use this screen to add a wireless station using WPS. Scheduling Use this screen to schedule the times the Wireless LAN is enabled. LAN IP Use this screen to configure LAN IP address and subnet mask. Maintenance System General Use this screen to view and change administrative settings such as system and domain names, password and inactivity timer. Time Setting Use this screen to change your NBG-416N's time and date. Logs View Log Use this screen to view the logs for the categories that you selected. Tools Firmware Use this screen to upload firmware to your NBG-416N. Configuration Use this screen to backup and restore the configuration or reset the factory defaults to your NBG-416N. Restart This screen allows you to reboot the NBG-416N without turning the power off. Sys OP Mode General This screen allows you to select the device operation mode: Router, Access Point, Client Bridge or Universal Repeater. Language Language This screen allows you to select the language you prefer. 4.5 Setting your NBG-416N to Client Bridge Mode 1 Connect your computer to the LAN port of the NBG-416N. 2 The default LAN IP address of the NBG-416N is 192.168.1.1 in router mode (192.168.1.2 by default in non-router mode). In router mode, the NBG-416N can assign your computer an IP address, so you must set your computer to get an IP address automatically (computer factory default) or give it a fixed IP address in the range between 192.168.1.3 and 192.168.1.254. 56 NBG-416N User's Guide
-
 1
1 -
2
-
3
-
4
-
5
-
6
-
7
-
8
-
9
-
10
-
11
-
12
-
13
-
14
-
15
-
16
-
17
-
18
-
19
-
20
-
21
-
22
-
23
-
24
-
25
-
26
-
27
-
28
-
29
-
30
-
31
-
32
-
33
-
34
-
35
-
36
-
37
-
38
-
39
-
40
-
41
-
42
-
43
-
44
-
45
-
46
-
47
-
48
-
49
-
50
-
 51
51 -
 52
52 -
 53
53 -
 54
54 -
 55
55 -
 56
56 -
 57
57 -
 58
58 -
 59
59 -
 60
60 -
 61
61 -
62
-
63
-
64
-
65
-
66
-
67
-
68
-
69
-
70
-
71
-
72
-
73
-
74
-
75
-
76
-
77
-
78
-
79
-
80
-
81
-
82
-
83
-
84
-
85
-
86
-
87
-
88
-
89
-
90
-
91
-
92
-
93
-
94
-
95
-
96
-
97
-
98
-
99
-
100
-
101
-
102
-
103
-
104
-
105
-
106
-
107
-
108
-
109
-
110
-
111
-
112
-
113
-
114
-
115
-
116
-
117
-
118
-
119
-
120
-
121
-
122
-
123
-
124
-
125
-
126
-
127
-
128
-
129
-
130
-
131
-
132
-
133
-
134
-
135
-
136
-
137
-
138
-
139
-
140
-
141
-
142
-
143
-
144
-
145
-
146
-
147
-
148
-
149
-
150
-
151
-
152
-
153
-
154
-
155
-
156
-
157
-
158
-
159
-
160
-
161
-
162
-
163
-
164
-
165
-
166
-
167
-
168
-
169
-
170
-
171
-
172
-
173
-
174
-
175
-
176
-
177
-
178
-
179
-
180
-
181
-
182
-
183
-
184
-
185
-
186
-
187
-
188
-
189
-
190
-
191
-
192
-
193
-
194
-
195
-
196
-
197
-
198
-
199
-
200
-
201
-
202
-
203
-
204
-
205
-
206
-
207
-
208
-
209
-
210
-
211
-
212
-
213
-
214
-
215
-
216
-
217
-
218
-
219
-
220
-
221
-
222
-
223
-
224
-
225
-
226
-
227
-
228
-
229
-
230
-
231
-
232
-
233
-
234
-
235
-
236
-
237
-
238
-
239
-
240
 |
 |
