ZyXEL NBG-419N v2 User Guide - Page 107
Table 44, Label, Description
 |
View all ZyXEL NBG-419N v2 manuals
Add to My Manuals
Save this manual to your list of manuals |
Page 107 highlights
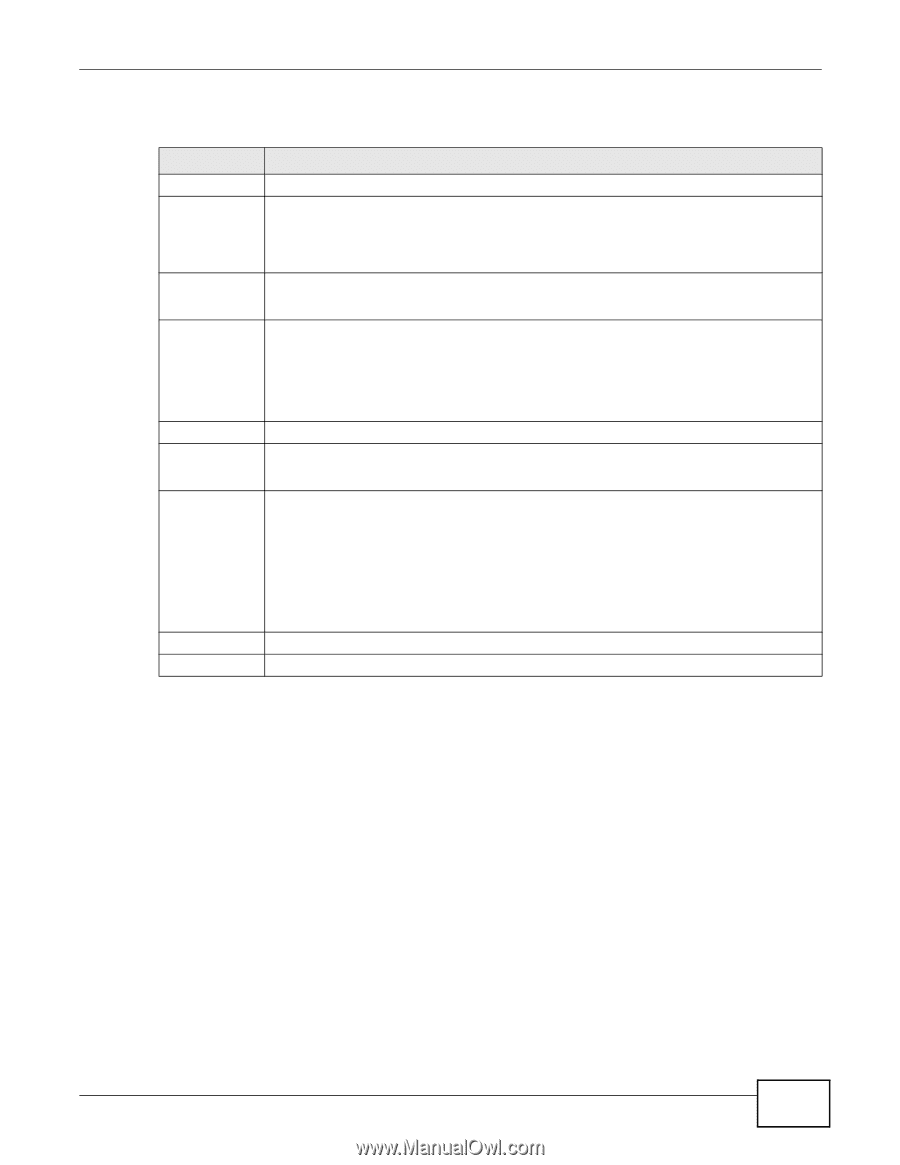
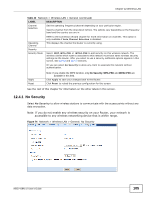
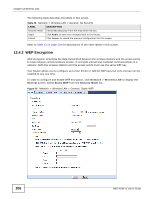
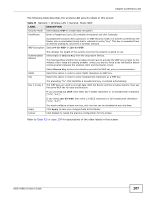
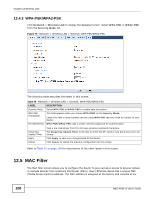
Chapter 12 Wireless LAN The following table describes the wireless LAN security labels in this screen. Table 44 Network > Wireless LAN > General: Static WEP LABEL Security Mode PassPhrase DESCRIPTION Select Static WEP to enable data encryption. Enter a Passphrase (up to 26 printable characters) and click Generate. A passphrase functions like a password. In WEP security mode, it is further converted by the Router into a complicated string that is referred to as the "key". This key is requested from all devices wishing to connect to a wireless network. WEP Encryption Select 64-bit WEP or 128-bit WEP. Authentication Method This dictates the length of the security key that the network is going to use. Select Auto or Shared Key from the drop-down list box. This field specifies whether the wireless clients have to provide the WEP key to login to the wireless client. Keep this setting at Auto unless you want to force a key verification before communication between the wireless client and the Router occurs. ASCII Hex Select Shared Key to force the clients to provide the WEP key prior to communication. Select this option in order to enter ASCII characters as WEP key. Select this option in order to enter hexadecimal characters as a WEP key. Key 1 to Key 4 The preceding "0x", that identifies a hexadecimal key, is entered automatically. The WEP keys are used to encrypt data. Both the Router and the wireless stations must use the same WEP key for data transmission. If you chose 64-bit WEP, then enter any 5 ASCII characters or 10 hexadecimal characters ("0-9", "A-F"). If you chose 128-bit WEP, then enter 13 ASCII characters or 26 hexadecimal characters ("0-9", "A-F"). Apply Cancel You must configure at least one key, only one key can be activated at any one time. Click Apply to save your changes back to the Router. Click Cancel to reload the previous configuration for this screen. Refer to Table 42 on page 104 for descriptions of the other labels in this screen. NBG-419N v2 User's Guide 107
-
 1
1 -
2
-
3
-
4
-
5
-
6
-
7
-
8
-
9
-
10
-
11
-
12
-
13
-
14
-
15
-
16
-
17
-
18
-
19
-
20
-
21
-
22
-
23
-
24
-
25
-
26
-
27
-
28
-
29
-
30
-
31
-
32
-
33
-
34
-
35
-
36
-
37
-
38
-
39
-
40
-
41
-
42
-
43
-
44
-
45
-
46
-
47
-
48
-
49
-
50
-
51
-
52
-
53
-
54
-
55
-
56
-
57
-
58
-
59
-
60
-
61
-
62
-
63
-
64
-
65
-
66
-
67
-
68
-
69
-
70
-
71
-
72
-
73
-
74
-
75
-
76
-
77
-
78
-
79
-
80
-
81
-
82
-
83
-
84
-
85
-
86
-
87
-
88
-
89
-
90
-
91
-
92
-
93
-
94
-
95
-
96
-
97
-
98
-
99
-
100
-
101
-
 102
102 -
 103
103 -
 104
104 -
 105
105 -
 106
106 -
 107
107 -
 108
108 -
 109
109 -
 110
110 -
 111
111 -
 112
112 -
113
-
114
-
115
-
116
-
117
-
118
-
119
-
120
-
121
-
122
-
123
-
124
-
125
-
126
-
127
-
128
-
129
-
130
-
131
-
132
-
133
-
134
-
135
-
136
-
137
-
138
-
139
-
140
-
141
-
142
-
143
-
144
-
145
-
146
-
147
-
148
-
149
-
150
-
151
-
152
-
153
-
154
-
155
-
156
-
157
-
158
-
159
-
160
-
161
-
162
-
163
-
164
-
165
-
166
-
167
-
168
-
169
-
170
-
171
-
172
-
173
-
174
-
175
-
176
-
177
-
178
-
179
-
180
-
181
-
182
-
183
-
184
-
185
-
186
-
187
-
188
-
189
-
190
-
191
-
192
-
193
-
194
-
195
-
196
-
197
-
198
-
199
-
200
-
201
-
202
-
203
-
204
-
205
-
206
-
207
-
208
-
209
-
210
-
211
-
212
-
213
-
214
-
215
-
216
-
217
-
218
-
219
-
220
-
221
-
222
-
223
-
224
-
225
-
226
-
227
-
228
-
229
-
230
-
231
-
232
-
233
-
234
-
235
-
236
-
237
-
238
-
239
-
240
-
241
-
242
-
243
-
244
-
245
-
246
-
247
-
248
-
249
-
250
-
251
-
252
-
253
-
254
-
255
-
256
-
257
-
258
-
259
-
260
-
261
-
262
-
263
-
264
-
265
-
266
-
267
-
268
-
269
-
270
-
271
-
272
-
273
-
274
-
275
-
276
-
277
-
278
 |
 |