ZyXEL NBG-419N v2 User Guide - Page 23
The ZyXEL NetUSB Share Center Configuration Window
 |
View all ZyXEL NBG-419N v2 manuals
Add to My Manuals
Save this manual to your list of manuals |
Page 23 highlights
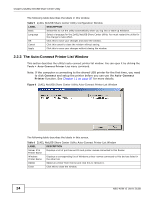
Chapter 2 ZyXEL NetUSB Share Center Utility Table 4 ZyXEL NetUSB Share Center Utility Main Screen Menus (continued) MENU Auto-Connect Printer ITEM Set Auto-Connect Printer DESCRIPTION You can set the selected printer to 'auto-connect' after you have connected it to your computer during inital connection. If the printer is auto-connected to your computer, they will always be connected over the network. You do not need to configure it manually each time. Click this to show your installed printer list and select the one you want to set as auto-connected. Note: If the computer is connecting to the shared USB printer for the first time, you need to click Connect and setup the printer before you can use the Auto-Connect Printer function. See Chapter 11 on page 87 for more details. Delete Auto-Connect Printer Note: You first must install the appropriate drivers for the printer that you intend to use. This removes the auto-connect option from the selected printer. 2.2.2 The ZyXEL NetUSB Share Center Configuration Window This section describes the utility's configuration window, which allows you to set certain options for the utility. These options do not apply to the USB devices connected to the Router. You can open it by clicking the Tools > Configuration menu command. Figure 5 ZyXEL NetUSB Share Center Utility Configuration Window NBG-419N v2 User's Guide 23
-
 1
1 -
2
-
3
-
4
-
5
-
6
-
7
-
8
-
9
-
10
-
11
-
12
-
13
-
14
-
15
-
16
-
17
-
 18
18 -
 19
19 -
 20
20 -
 21
21 -
 22
22 -
 23
23 -
 24
24 -
 25
25 -
 26
26 -
 27
27 -
 28
28 -
29
-
30
-
31
-
32
-
33
-
34
-
35
-
36
-
37
-
38
-
39
-
40
-
41
-
42
-
43
-
44
-
45
-
46
-
47
-
48
-
49
-
50
-
51
-
52
-
53
-
54
-
55
-
56
-
57
-
58
-
59
-
60
-
61
-
62
-
63
-
64
-
65
-
66
-
67
-
68
-
69
-
70
-
71
-
72
-
73
-
74
-
75
-
76
-
77
-
78
-
79
-
80
-
81
-
82
-
83
-
84
-
85
-
86
-
87
-
88
-
89
-
90
-
91
-
92
-
93
-
94
-
95
-
96
-
97
-
98
-
99
-
100
-
101
-
102
-
103
-
104
-
105
-
106
-
107
-
108
-
109
-
110
-
111
-
112
-
113
-
114
-
115
-
116
-
117
-
118
-
119
-
120
-
121
-
122
-
123
-
124
-
125
-
126
-
127
-
128
-
129
-
130
-
131
-
132
-
133
-
134
-
135
-
136
-
137
-
138
-
139
-
140
-
141
-
142
-
143
-
144
-
145
-
146
-
147
-
148
-
149
-
150
-
151
-
152
-
153
-
154
-
155
-
156
-
157
-
158
-
159
-
160
-
161
-
162
-
163
-
164
-
165
-
166
-
167
-
168
-
169
-
170
-
171
-
172
-
173
-
174
-
175
-
176
-
177
-
178
-
179
-
180
-
181
-
182
-
183
-
184
-
185
-
186
-
187
-
188
-
189
-
190
-
191
-
192
-
193
-
194
-
195
-
196
-
197
-
198
-
199
-
200
-
201
-
202
-
203
-
204
-
205
-
206
-
207
-
208
-
209
-
210
-
211
-
212
-
213
-
214
-
215
-
216
-
217
-
218
-
219
-
220
-
221
-
222
-
223
-
224
-
225
-
226
-
227
-
228
-
229
-
230
-
231
-
232
-
233
-
234
-
235
-
236
-
237
-
238
-
239
-
240
-
241
-
242
-
243
-
244
-
245
-
246
-
247
-
248
-
249
-
250
-
251
-
252
-
253
-
254
-
255
-
256
-
257
-
258
-
259
-
260
-
261
-
262
-
263
-
264
-
265
-
266
-
267
-
268
-
269
-
270
-
271
-
272
-
273
-
274
-
275
-
276
-
277
-
278
 |
 |
