3Com 3CBLUG16A User Guide - Page 19
Removing an SFP Transceiver, Performing Spot Checks
 |
UPC - 662705544489
View all 3Com 3CBLUG16A manuals
Add to My Manuals
Save this manual to your list of manuals |
Page 19 highlights
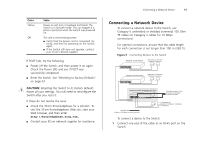
Figure 4 Inserting an SFP Transceiver Product label Wire release lever Module Present Suitable slot on host Switch LiFnlka/sAhc=tivAitcyt : 2 Gently slide the transceiver into the SFP slot until it clicks into place. CAUTION: SFP transceivers are keyed and can be properly inserted only one way. If the transceiver does not click when you insert it, remove it, turn it over, and then re-insert it. 3 Remove the plastic protective cover, if fitted. 4 Connect the fiber cable. 5 The transceiver connects to the network using a duplex LC connector. Attach a male duplex LC connector on the network cable into the duplex LC connector on the transceiver. 6 Connect the other end of the cable to a device fitted with an appropriate Gigabit Ethernet connection. Performing Spot Checks 19 7 Check the Module Active LEDs on the front of the Switch to ensure that it is operating correctly. Removing an SFP Transceiver Removing an SFP transceiver does not require powering off the Switch. To remove an SFP transceiver: 1 Disconnect the cable from the transceiver. 2 Move the wire release lever downwards until it is pointing toward you. 3 Pull the wire release lever toward you to release the catch mechanism. The SFP transceiver should slide out easily. Performing Spot Checks At frequent intervals, you should visually check the Switch. Regular checks can give you an early warning of a possible failure; any problems can then be attended to when there will be least effect on users. 3Com recommends periodically checking the items listed in Table 6.
-
 1
1 -
2
-
3
-
4
-
5
-
6
-
7
-
8
-
9
-
10
-
11
-
12
-
13
-
 14
14 -
 15
15 -
 16
16 -
 17
17 -
 18
18 -
 19
19 -
 20
20 -
 21
21 -
 22
22 -
 23
23 -
 24
24 -
25
-
26
-
27
-
28
-
29
-
30
-
31
-
32
-
33
-
34
-
35
-
36
-
37
-
38
-
39
-
40
-
41
-
42
-
43
-
44
-
45
-
46
-
47
-
48
-
49
-
50
-
51
-
52
-
53
-
54
-
55
-
56
-
57
-
58
-
59
-
60
-
61
-
62
-
63
-
64
-
65
-
66
-
67
-
68
-
69
-
70
-
71
-
72
 |
 |
