Adaptec 3405 User Guide - Page 53
Making Your Array Bootable, - raid 10
 |
UPC - 760884155028
View all Adaptec 3405 manuals
Add to My Manuals
Save this manual to your list of manuals |
Page 53 highlights
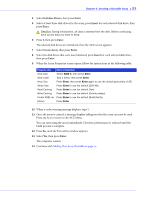
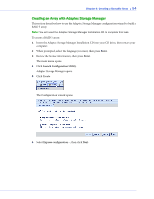
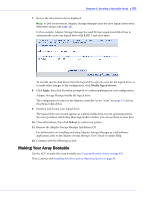
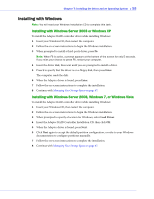
Chapter 6: Creating a Bootable Array ● 53 4 Select Initialize Drives, then press Enter. 5 Select at least three disk drives for the array, press Insert for each selected disk drive, then press Enter. ! Caution: During initialization, all data is deleted from the disk. Before continuing, back up any data you want to keep. 6 Press Y, then press Enter. The selected disk drives are initialized, then the ACU screen appears. 7 Select Create Array, then press Enter. 8 Select the disk drives that were just initialized, press Insert for each selected disk drive, then press Enter. 9 When the Array Properties screen opens, follow the instructions in the following table. Property Line Array Type Array Label Array Size Stripe Size Read Caching Write Caching Create RAID via [Done] Entry or Selection Select RAID 5, then press Enter. Type a name, then press Enter. Press Enter, then press Enter again to use the default granularity of GB. Press Enter to use the default (256 KB). Press Enter to use the default (Yes). Press Enter to use the default (Enable always). Press Enter to use the default (Build/Verify). Press Enter. 10 When a cache warning message displays, type Y. 11 Once the array is created, a message displays telling you that the array can now be used. Press any key to return to the ACU Menu. You can start using the array immediately. However, performance is reduced until the build process is complete. 12 Press Esc until the Exit utility window appears. 13 Select Yes, then press Enter. The computer restarts. 14 Continue with Making Your Array Bootable on page 55.
-
 1
1 -
2
-
3
-
4
-
5
-
6
-
7
-
8
-
9
-
10
-
11
-
12
-
13
-
14
-
15
-
16
-
17
-
18
-
19
-
20
-
21
-
22
-
23
-
24
-
25
-
26
-
27
-
28
-
29
-
30
-
31
-
32
-
33
-
34
-
35
-
36
-
37
-
38
-
39
-
40
-
41
-
42
-
43
-
44
-
45
-
46
-
47
-
 48
48 -
 49
49 -
 50
50 -
 51
51 -
 52
52 -
 53
53 -
 54
54 -
 55
55 -
 56
56 -
 57
57 -
 58
58 -
59
-
60
-
61
-
62
-
63
-
64
-
65
-
66
-
67
-
68
-
69
-
70
-
71
-
72
-
73
-
74
-
75
-
76
-
77
-
78
-
79
-
80
-
81
-
82
-
83
-
84
-
85
-
86
-
87
-
88
-
89
-
90
-
91
-
92
-
93
-
94
-
95
-
96
-
97
-
98
-
99
-
100
-
101
-
102
-
103
-
104
-
105
-
106
-
107
-
108
-
109
-
110
-
111
-
112
-
113
-
114
-
115
-
116
-
117
-
118
-
119
-
120
-
121
-
122
-
123
-
124
-
125
-
126
-
127
-
128
-
129
-
130
-
131
-
132
-
133
-
134
-
135
-
136
-
137
-
138
-
139
-
140
-
141
-
142
-
143
-
144
-
145
-
146
-
147
-
148
-
149
-
150
-
151
-
152
-
153
-
154
-
155
-
156
-
157
-
158
 |
 |
