Brother International BAS-342E Instruction Manual - English - Page 45
Wiper, adjustment, Adjustment, pressure
 |
View all Brother International BAS-342E manuals
Add to My Manuals
Save this manual to your list of manuals |
Page 45 highlights
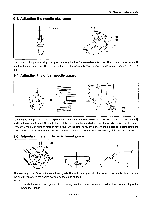
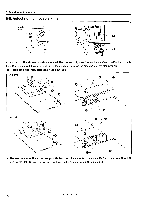
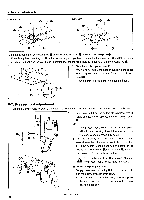
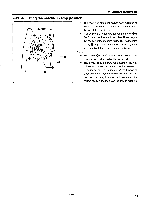
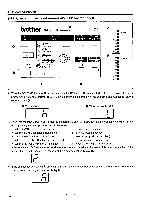
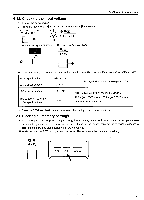
9. Standard adjustments 9-9. Wiper adjustment • For vertical wiper (standard) 0 0 112 mm 0 approx. 2 mm 15 mm Fig. A 1. When the thread wiper solenoid plunger 0 is driven to the full stroke, the wiper 0 should be 15 mm in front of the needle center. Loosen screws 0 and shift the entire solenoid bracket 0 up or down to adjust. The standard height from the solenoid bracket 0 bottom to the needle plate top is approximately 112 mm. 2. When the wiper 0 is operated and aligned with the center of the needle bar, the distance from the wiper 0 to needle tip should be approximately 2 mm. Loosen screw 0 and move the wiper 0 in or out to adjust. As shown in Fig. A, make sure the wiper 0 does not strike the presser foot 0 or needle. NOTE Check that the wiper 0 is not touching the finger guard. 9-10. Adjustment of air pressure c Ill 1. Air pressure should be 0.49 MPa [5 kg/cm2]. The air pressure can be adjusted by pulling up andturning the control knob 0 on the integrator 0. After adjustment is complete, push the control knob 0 downward to lock it. 2. If water stands in the bottle of the integrator 0, turn the drain cock 0 in the direction indicated by an arrow to drain the water. NOTE Open the air cock 0 slowly. -CT BAS-341E • 342E 38
-
 1
1 -
2
-
3
-
4
-
5
-
6
-
7
-
8
-
9
-
10
-
11
-
12
-
13
-
14
-
15
-
16
-
17
-
18
-
19
-
20
-
21
-
22
-
23
-
24
-
25
-
26
-
27
-
28
-
29
-
30
-
31
-
32
-
33
-
34
-
35
-
36
-
37
-
38
-
39
-
 40
40 -
 41
41 -
 42
42 -
 43
43 -
 44
44 -
 45
45 -
 46
46 -
 47
47 -
 48
48 -
 49
49 -
 50
50 -
51
-
52
-
53
-
54
-
55
-
56
-
57
-
58
-
59
-
60
-
61
-
62
-
63
-
64
-
65
-
66
-
67
 |
 |
