Brother International MFC-J4510DW Quick Setup Guide - English - Page 22
Environmental Advice for Imaging - drivers
 |
View all Brother International MFC-J4510DW manuals
Add to My Manuals
Save this manual to your list of manuals |
Page 22 highlights
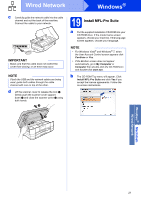
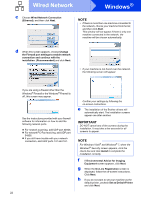
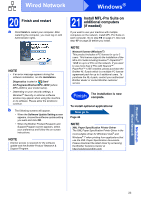
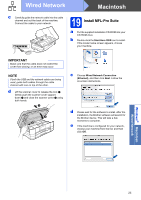
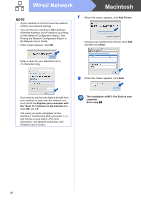
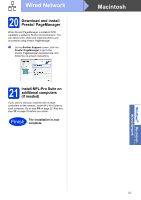
Wired Network Windows® c Choose Wired Network Connection (Ethernet), and then click Next. NOTE • If there is more than one machine connected to the network, choose your machine from the list, and then click Next. This window will not appear if there is only one machine connected to the network, the machine will be chosen automatically. d When this screen appears, choose Change the Firewall port settings to enable network connection and continue with the installation. (Recommended) and click Next. • If your machine is not found over the network, the following screen will appear. If you are using a firewall other than the Windows® Firewall or the Windows® Firewall is off, this screen may appear. See the instructions provided with your firewall software for information on how to add the following network ports. For network scanning, add UDP port 54925. For network PC-Fax receiving, add UDP port 54926. If you still have trouble with your network connection, add UDP ports 137 and 161. Confirm your settings by following the on-screen instructions. e The installation of the Brother drivers will automatically start. The installation screens appear one after another. IMPORTANT DO NOT cancel any of the screens during the installation. It may take a few seconds for all screens to appear. NOTE For Windows Vista® and Windows® 7, when the Windows® Security screen appears, click the check box and click Install to complete the installation correctly. f If Environmental Advice for Imaging Equipment screen appears, click Next. g When the On-Line Registration screen is displayed, follow the on-screen instructions. Click Next. h If you do not want to set your machine as the default printer, uncheck Set as Default Printer and click Next. 22
-
 1
1 -
2
-
3
-
4
-
5
-
6
-
7
-
8
-
9
-
10
-
11
-
12
-
13
-
14
-
15
-
16
-
 17
17 -
 18
18 -
 19
19 -
 20
20 -
 21
21 -
 22
22 -
 23
23 -
 24
24 -
 25
25 -
 26
26 -
 27
27 -
28
-
29
-
30
-
31
-
32
-
33
-
34
-
35
-
36
-
37
-
38
-
39
-
40
-
41
-
42
-
43
-
44
-
45
-
46
 |
 |
