Brother International MFC-J4510DW Quick Setup Guide - English - Page 5
Install the ink cartridges
 |
View all Brother International MFC-J4510DW manuals
Add to My Manuals
Save this manual to your list of manuals |
Page 5 highlights
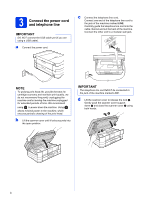
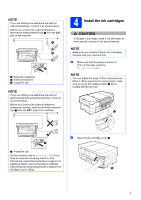
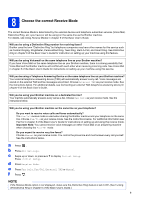
NOTE If you are sharing one telephone line with an external telephone, connect it as shown below. Before you connect the external telephone, remove the white protective cap c from the EXT. jack of the machine. 1 2 3 a Extension telephone b External telephone c Protective cap NOTE If you are sharing one telephone line with an external telephone answering machine, connect it as shown below. Before you connect the external telephone answering machine, remove the white protective cap a from the EXT. jack of the machine. 4 Install the ink cartridges CAUTION If ink gets in your eyes, wash it out with water at once and call a doctor if you are concerned. NOTE Make sure you install the Starter Ink Cartridges included with your machine first. a Make sure that the power is turned on. The Touchscreen will show No Ink Cartridge. NOTE You can adjust the angle of the control panel by lifting it. When lowering the control panel, make sure you push the release button a that is located behind the mark. 1 1 a Protective cap Set the receive mode to External TAD if you have an external answering machine. See Choose the correct Receive Mode on page 9. For additional details, see Connecting an external TAD (telephone answering device) in chapter 6 of the Basic User's Guide. b Open the ink cartridge cover a. 1 5
-
 1
1 -
 2
2 -
 3
3 -
 4
4 -
 5
5 -
 6
6 -
 7
7 -
 8
8 -
 9
9 -
 10
10 -
 11
11 -
12
-
13
-
14
-
15
-
16
-
17
-
18
-
19
-
20
-
21
-
22
-
23
-
24
-
25
-
26
-
27
-
28
-
29
-
30
-
31
-
32
-
33
-
34
-
35
-
36
-
37
-
38
-
39
-
40
-
41
-
42
-
43
-
44
-
45
-
46
 |
 |
