Brother International MFC-J4510DW Quick Setup Guide - English - Page 6
Install each ink cartridge in the direction of
 |
View all Brother International MFC-J4510DW manuals
Add to My Manuals
Save this manual to your list of manuals |
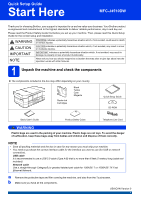
Page 6 highlights
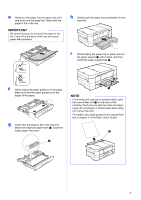
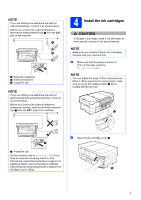
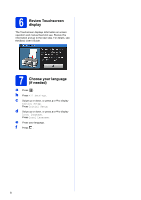
c Remove the orange protective part a. e Take care to match the sticker color a with the cartridge color b as shown in the diagram below. Install each ink cartridge in the direction of the arrow on the label. 1 NOTE Do not throw away the orange protective part. You will need it if you transport the machine. d Unpack the ink cartridge. Turn the green release lever on the orange protective packing a counterclockwise until it clicks to release the vacuum seal. Then remove the orange protective packing a as shown. 1 2 f Gently push the back of the ink cartridge marked "PUSH" until it latches. After all the ink cartridges are installed close the ink cartridge cover. 2 1 2 1 NOTE The machine will prepare the ink tube system for printing. This process will take approximately four minutes. Do not turn off the machine. IMPORTANT • DO NOT shake the ink cartridges. If ink stains your skin or clothing, wash with soap or detergent at once. • DO NOT touch the cartridge in the area indicated b, as this can cause the machine not to function with the cartridge. 6
-
 1
1 -
 2
2 -
 3
3 -
 4
4 -
 5
5 -
 6
6 -
 7
7 -
 8
8 -
 9
9 -
 10
10 -
 11
11 -
 12
12 -
13
-
14
-
15
-
16
-
17
-
18
-
19
-
20
-
21
-
22
-
23
-
24
-
25
-
26
-
27
-
28
-
29
-
30
-
31
-
32
-
33
-
34
-
35
-
36
-
37
-
38
-
39
-
40
-
41
-
42
-
43
-
44
-
45
-
46
 |
 |
