Brother International PE-DESIGN Ver.5 Users Manual - English - Page 119
Resolution, Thinning, Process, Pick Area, Cancel, Normal, Coarse
 |
View all Brother International PE-DESIGN Ver.5 manuals
Add to My Manuals
Save this manual to your list of manuals |
Page 119 highlights
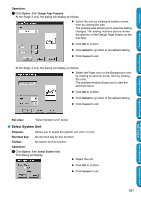
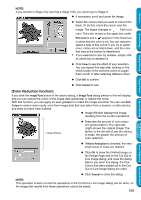
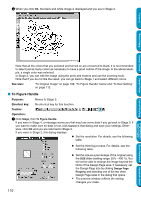
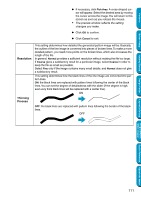
Contents Before Using Getting Started N If necessary, click Pick Area. A cross-shaped cursor will appear. Select the desired area by moving the cursor across the image.You will return to this screen as soon as you release the mouse. • The preview window reflects the setting changes you make. N Click OK to confirm. N Click Cancel to exit. Resolution This setting determines how detailed the generated pattern image will be. Basically, the outline of the line image is converted into pieces of broken lines. To make a more detailed pattern, you need more points on the broken lines, which also increases the length of the file. In general, Normal provides a sufficient resolution without making the file too large. If Coarse gives a satisfactory result for a particular image, select Coarse in order to keep the file as small as possible. Select Fine only if the image contains many small details, and Normal does not give a satisfactory result. This setting determines how the black lines of the line image are converted into pattern lines. ON: the black lines are replaced with pattern lines following the center of the black lines. You can set the degree of detailedness with the slider (if the degree is high, even very thick black lines will be replaced with a center line). ON Thinning Process OFF: the black lines are replaced with pattern lines following the border of the black lines. OFF Design Center Layout & Editing Programmable Stitch Creator Quick Reference Alphabetic Index 111
-
 1
1 -
2
-
3
-
4
-
5
-
6
-
7
-
8
-
9
-
10
-
11
-
12
-
13
-
14
-
15
-
16
-
17
-
18
-
19
-
20
-
21
-
22
-
23
-
24
-
25
-
26
-
27
-
28
-
29
-
30
-
31
-
32
-
33
-
34
-
35
-
36
-
37
-
38
-
39
-
40
-
41
-
42
-
43
-
44
-
45
-
46
-
47
-
48
-
49
-
50
-
51
-
52
-
53
-
54
-
55
-
56
-
57
-
58
-
59
-
60
-
61
-
62
-
63
-
64
-
65
-
66
-
67
-
68
-
69
-
70
-
71
-
72
-
73
-
74
-
75
-
76
-
77
-
78
-
79
-
80
-
81
-
82
-
83
-
84
-
85
-
86
-
87
-
88
-
89
-
90
-
91
-
92
-
93
-
94
-
95
-
96
-
97
-
98
-
99
-
100
-
101
-
102
-
103
-
104
-
105
-
106
-
107
-
108
-
109
-
110
-
111
-
112
-
113
-
 114
114 -
 115
115 -
 116
116 -
 117
117 -
 118
118 -
 119
119 -
 120
120 -
 121
121 -
 122
122 -
 123
123 -
 124
124 -
125
-
126
-
127
-
128
-
129
-
130
-
131
-
132
-
133
-
134
-
135
-
136
-
137
-
138
-
139
-
140
-
141
-
142
-
143
-
144
-
145
-
146
-
147
-
148
-
149
-
150
-
151
-
152
-
153
-
154
-
155
-
156
-
157
-
158
-
159
-
160
-
161
-
162
-
163
-
164
-
165
-
166
-
167
-
168
-
169
-
170
-
171
-
172
-
173
-
174
-
175
-
176
-
177
-
178
-
179
-
180
-
181
-
182
-
183
-
184
-
185
-
186
-
187
-
188
-
189
-
190
-
191
-
192
-
193
-
194
-
195
-
196
-
197
-
198
-
199
-
200
-
201
-
202
-
203
-
204
-
205
-
206
-
207
-
208
-
209
-
210
-
211
-
212
-
213
-
214
-
215
-
216
-
217
-
218
-
219
-
220
-
221
-
222
-
223
-
224
-
225
-
226
-
227
-
228
-
229
-
230
-
231
-
232
-
233
-
234
-
235
-
236
-
237
-
238
-
239
-
240
-
241
-
242
-
243
-
244
-
245
-
246
-
247
-
248
-
249
-
250
-
251
-
252
-
253
-
254
-
255
-
256
-
257
-
258
-
259
-
260
-
261
-
262
-
263
-
264
-
265
-
266
-
267
-
268
-
269
-
270
-
271
-
272
-
273
-
274
 |
 |
