Brother International PE-DESIGN Ver.5 Users Manual - English - Page 219
Operation, Selecting data, Changing the sewing order, Changing the color, Shift, Sewing Order
 |
View all Brother International PE-DESIGN Ver.5 manuals
Add to My Manuals
Save this manual to your list of manuals |
Page 219 highlights
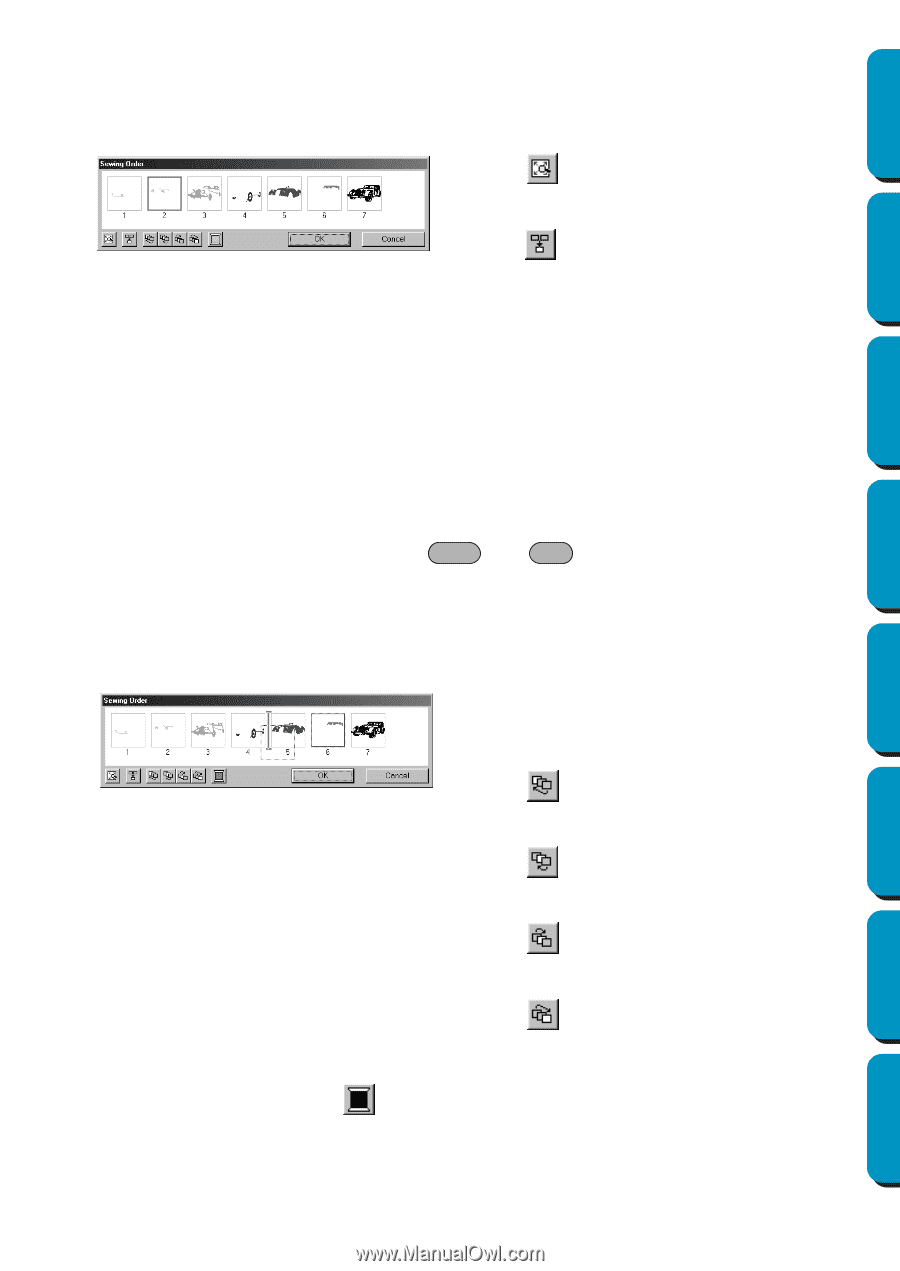
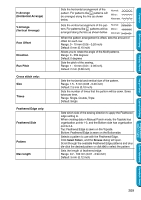
Contents Operation: 1 Click Sew, then Sewing Order. A dialog similar to the one shown below appears. The dialog can be made longer so that all parts of the pattern can be viewed. N Click frame. to enlarge each pattern to fill its Before Using Getting Started N Click to display in one frame all patterns of the same color that will be sewn together. If multiple patterns are displayed in a frame, a plus sign (+) appears beside the number of that frame. N Click OK to apply the settings and close the dialog. N Click Cancel to close the dialog without changing the settings. Selecting data: Select a pattern by clicking it. The selected pattern is framed with a thick line and the corresponding area in the Design Page is surrounded with a dotted line. To select multiple patterns, hold down the Shift and Ctrl keys while clicking the patterns. In addition, multiple patterns can be selected by dragging the pointer over them. Changing the sewing order: The sewing order can be changed by selecting a pattern and dragging it to the desired location. The destination location is indicated by the red line while the pattern is being dragged, and the selected data is moved to the indicated location once the pattern is released. In addition, after a pattern is selected, its sewing order can be changed by clicking the following buttons. Design Center Layout & Editing Programmable Stitch Creator N Click to move the selected pattern to the beginning of the sewing order. N Click to move the selected pattern ahead one position in the sewing order. Quick Reference Alphabetic Index N Click to move the selected pattern back one position in the sewing order. N Click to move the selected pattern to the end of the sewing order. Changing the color: Select a pattern, and then click to display the Thread Color dialog that allows the thread color to be changed. NOTE: The frames around whole objects (with no hole settings applied) or objects with no sewing settings applied will be a dotted line. In addition, there will be no number for the sewing order below the frame. 211
-
 1
1 -
2
-
3
-
4
-
5
-
6
-
7
-
8
-
9
-
10
-
11
-
12
-
13
-
14
-
15
-
16
-
17
-
18
-
19
-
20
-
21
-
22
-
23
-
24
-
25
-
26
-
27
-
28
-
29
-
30
-
31
-
32
-
33
-
34
-
35
-
36
-
37
-
38
-
39
-
40
-
41
-
42
-
43
-
44
-
45
-
46
-
47
-
48
-
49
-
50
-
51
-
52
-
53
-
54
-
55
-
56
-
57
-
58
-
59
-
60
-
61
-
62
-
63
-
64
-
65
-
66
-
67
-
68
-
69
-
70
-
71
-
72
-
73
-
74
-
75
-
76
-
77
-
78
-
79
-
80
-
81
-
82
-
83
-
84
-
85
-
86
-
87
-
88
-
89
-
90
-
91
-
92
-
93
-
94
-
95
-
96
-
97
-
98
-
99
-
100
-
101
-
102
-
103
-
104
-
105
-
106
-
107
-
108
-
109
-
110
-
111
-
112
-
113
-
114
-
115
-
116
-
117
-
118
-
119
-
120
-
121
-
122
-
123
-
124
-
125
-
126
-
127
-
128
-
129
-
130
-
131
-
132
-
133
-
134
-
135
-
136
-
137
-
138
-
139
-
140
-
141
-
142
-
143
-
144
-
145
-
146
-
147
-
148
-
149
-
150
-
151
-
152
-
153
-
154
-
155
-
156
-
157
-
158
-
159
-
160
-
161
-
162
-
163
-
164
-
165
-
166
-
167
-
168
-
169
-
170
-
171
-
172
-
173
-
174
-
175
-
176
-
177
-
178
-
179
-
180
-
181
-
182
-
183
-
184
-
185
-
186
-
187
-
188
-
189
-
190
-
191
-
192
-
193
-
194
-
195
-
196
-
197
-
198
-
199
-
200
-
201
-
202
-
203
-
204
-
205
-
206
-
207
-
208
-
209
-
210
-
211
-
212
-
213
-
 214
214 -
 215
215 -
 216
216 -
 217
217 -
 218
218 -
 219
219 -
 220
220 -
 221
221 -
 222
222 -
 223
223 -
 224
224 -
225
-
226
-
227
-
228
-
229
-
230
-
231
-
232
-
233
-
234
-
235
-
236
-
237
-
238
-
239
-
240
-
241
-
242
-
243
-
244
-
245
-
246
-
247
-
248
-
249
-
250
-
251
-
252
-
253
-
254
-
255
-
256
-
257
-
258
-
259
-
260
-
261
-
262
-
263
-
264
-
265
-
266
-
267
-
268
-
269
-
270
-
271
-
272
-
273
-
274
 |
 |