Brother International PE-DESIGN Ver.5 Users Manual - English - Page 222
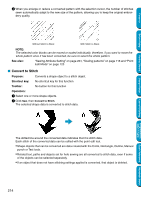
Convert to Stitch, The dotted line around the converted data indicates that it is stitch data.
 |
View all Brother International PE-DESIGN Ver.5 manuals
Add to My Manuals
Save this manual to your list of manuals |
Page 222 highlights
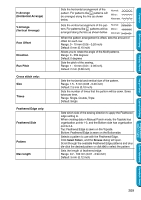
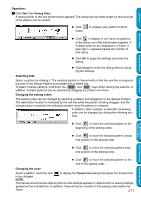
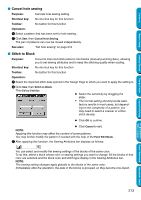
Contents Before Using Getting Started 4 When you enlarge or reduce a converted pattern with the selection cursor, the number of stitches sewn automatically adapt to the new size of the pattern, allowing you to keep the original embroidery quality. Without Stitch to Block With Stitch to Block NOTE: The selected color blocks can be moved or scaled individually, therefore, if you want to move the whole pattern once it has been converted, be sure to select the whole pattern. See also: "Sewing Attribute Setting" on page 204, "Scaling patterns" on page 118 and "Point Edit Mode" on page 120 I Convert to Stitch Purpose: Converts a shape object to a stitch object. Shortcut key: No shortcut key for this function Toolbar: No button for this function Operation: 1 Select one or more shape objects. 2 Click Sew, then Convert to Stitch. The selected shape data is converted to stitch data. Design Center Layout & Editing Programmable Stitch Creator Quick Reference Alphabetic Index The dotted line around the converted data indicates that it is stitch data. Each stitch of the converted data can be edited with the point edit tool. • Shape objects that can be converted are data created with the Circle, Rectangle, Outline, Manual punch or Text tools. • Related text, paths and objects set for hole sewing are all converted to stitch data, even if some of the objects can be selected separately. • If an object that does not have stitching settings applied is converted, that object is deleted. 214
-
 1
1 -
2
-
3
-
4
-
5
-
6
-
7
-
8
-
9
-
10
-
11
-
12
-
13
-
14
-
15
-
16
-
17
-
18
-
19
-
20
-
21
-
22
-
23
-
24
-
25
-
26
-
27
-
28
-
29
-
30
-
31
-
32
-
33
-
34
-
35
-
36
-
37
-
38
-
39
-
40
-
41
-
42
-
43
-
44
-
45
-
46
-
47
-
48
-
49
-
50
-
51
-
52
-
53
-
54
-
55
-
56
-
57
-
58
-
59
-
60
-
61
-
62
-
63
-
64
-
65
-
66
-
67
-
68
-
69
-
70
-
71
-
72
-
73
-
74
-
75
-
76
-
77
-
78
-
79
-
80
-
81
-
82
-
83
-
84
-
85
-
86
-
87
-
88
-
89
-
90
-
91
-
92
-
93
-
94
-
95
-
96
-
97
-
98
-
99
-
100
-
101
-
102
-
103
-
104
-
105
-
106
-
107
-
108
-
109
-
110
-
111
-
112
-
113
-
114
-
115
-
116
-
117
-
118
-
119
-
120
-
121
-
122
-
123
-
124
-
125
-
126
-
127
-
128
-
129
-
130
-
131
-
132
-
133
-
134
-
135
-
136
-
137
-
138
-
139
-
140
-
141
-
142
-
143
-
144
-
145
-
146
-
147
-
148
-
149
-
150
-
151
-
152
-
153
-
154
-
155
-
156
-
157
-
158
-
159
-
160
-
161
-
162
-
163
-
164
-
165
-
166
-
167
-
168
-
169
-
170
-
171
-
172
-
173
-
174
-
175
-
176
-
177
-
178
-
179
-
180
-
181
-
182
-
183
-
184
-
185
-
186
-
187
-
188
-
189
-
190
-
191
-
192
-
193
-
194
-
195
-
196
-
197
-
198
-
199
-
200
-
201
-
202
-
203
-
204
-
205
-
206
-
207
-
208
-
209
-
210
-
211
-
212
-
213
-
214
-
215
-
216
-
 217
217 -
 218
218 -
 219
219 -
 220
220 -
 221
221 -
 222
222 -
 223
223 -
 224
224 -
 225
225 -
 226
226 -
 227
227 -
228
-
229
-
230
-
231
-
232
-
233
-
234
-
235
-
236
-
237
-
238
-
239
-
240
-
241
-
242
-
243
-
244
-
245
-
246
-
247
-
248
-
249
-
250
-
251
-
252
-
253
-
254
-
255
-
256
-
257
-
258
-
259
-
260
-
261
-
262
-
263
-
264
-
265
-
266
-
267
-
268
-
269
-
270
-
271
-
272
-
273
-
274
 |
 |
