Brother International PT-3600 Users Manual - English and Spanish - Page 39
Reading the User’s Guide - pt user manual
 |
UPC - 012502602804
View all Brother International PT-3600 manuals
Add to My Manuals
Save this manual to your list of manuals |
Page 39 highlights
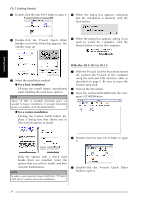
Getting Started F After the computer has started up again, connect the P-touch to the computer using the enclosed USB interface cable as described on page 9, and then turn on the P-touch. Selecting the PT-9600/3600 as the printer Ch. 2 Getting Started To select the printer: With a Mac OS before OS X: 1 Turn on the P-touch 9600/3600. 2 Pull down the Apple menu and select "Chooser" to display the Chooser window. 5 Click the Add Printer button. A list of detected USB printers appears. 6 Select "PT-9600/3600" from the USB list, and then click the Add button. The PT-9600/3600 appears in the Printer List. 7 Quit Print Center. Reading the User's Guide The P-touch Editor User's Guide can be viewed either by inserting the CD-ROM into the drive each time you wish to refer to it or by installing it onto your computer so that it is quickly available at any time. Since the User's Guide is an HTML document, a browser is needed to read it. 3 In the list on the left, click the PT-9600/ 3600 icon. Then, select the appropriate printer from the list on the right. 4 Close the Chooser window to confirm your settings. With Mac OS X 10.1 to 10.2.3: 1 Turn on the P-touch 9600/3600. 2 Double-click the Applications folder on the Macintosh HD to open it. 3 Double-click the Utilities folder to open it. 4 Double-click "Print Center" to start it up. NOTE If no printers have been added, a message appears, allowing you to add to your list of printers. Click the Add button. On a Computer Running Windows® To view the User's Guide from the CD-ROM: 1 Start up Windows® Explorer. 2 Select the CD-ROM drive. 3 Double-click the Ptouch folder 4 Double-click the Manual folder 5 Double-click "Main.htm". To view the User's Guide installed on the hard disk: 1 Click the Start button in the taskbar to display the Start menu. 2 Point to "Programs". 3 Point to "P-touch Editor 3.2". 4 Click "The User's Guide P-touch Editor 3.2". 27
-
 1
1 -
2
-
3
-
4
-
5
-
6
-
7
-
8
-
9
-
10
-
11
-
12
-
13
-
14
-
15
-
16
-
17
-
18
-
19
-
20
-
21
-
22
-
23
-
24
-
25
-
26
-
27
-
28
-
29
-
30
-
31
-
32
-
33
-
 34
34 -
 35
35 -
 36
36 -
 37
37 -
 38
38 -
 39
39 -
 40
40 -
 41
41 -
 42
42 -
 43
43 -
 44
44 -
45
-
46
-
47
-
48
-
49
-
50
-
51
-
52
-
53
-
54
-
55
-
56
-
57
-
58
-
59
-
60
-
61
-
62
-
63
-
64
-
65
-
66
-
67
-
68
-
69
-
70
-
71
-
72
-
73
-
74
-
75
-
76
-
77
-
78
-
79
-
80
-
81
-
82
-
83
-
84
-
85
-
86
-
87
-
88
-
89
-
90
-
91
-
92
-
93
-
94
-
95
-
96
-
97
-
98
-
99
-
100
-
101
-
102
-
103
-
104
-
105
-
106
-
107
-
108
-
109
-
110
-
111
-
112
-
113
-
114
-
115
-
116
-
117
-
118
-
119
-
120
-
121
-
122
-
123
-
124
-
125
-
126
-
127
-
128
-
129
-
130
-
131
-
132
-
133
-
134
-
135
-
136
-
137
-
138
-
139
-
140
-
141
-
142
-
143
-
144
-
145
-
146
-
147
-
148
-
149
-
150
-
151
-
152
-
153
-
154
-
155
-
156
-
157
-
158
-
159
-
160
-
161
-
162
-
163
-
164
-
165
-
166
-
167
-
168
-
169
-
170
-
171
-
172
-
173
-
174
-
175
-
176
-
177
-
178
-
179
-
180
-
181
-
182
-
183
-
184
-
185
-
186
-
187
-
188
-
189
-
190
-
191
-
192
-
193
-
194
-
195
-
196
-
197
-
198
-
199
-
200
-
201
-
202
-
203
-
204
-
205
-
206
-
207
-
208
-
209
-
210
-
211
-
212
 |
 |
