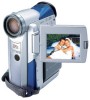
Canon 40MC Elura Instruction Manual - Page 22
Playing Back a Cassette
 |
UPC - 013803014938
View all Canon 40MC manuals
Add to My Manuals
Save this manual to your list of manuals |
Page 22 highlights
Playing Back a Cassette E VCR • OFF • MOVIE • P.SCAN • PHOTO • VCPROWETR OFF MOVIE P.SCAN PHOTO REC SEARCH D.EFFECTS ON/OFF Mastering the Basics You can use the LCD screen for instant, on-the-spot playback. The camera also plays back the sound track via the built-in speaker (p. 21). • When you play back a tape, you can also close the LCD panel with its screen side facing up. • When the LCD panel is closed, you can monitor the playback using the viewfinder. To play back your recordings on a TV, see p. 25. To use the wireless controller, see p. 33. Notes: • To avoid accidental recording, make sure that you slide the tab on the cassette so that it exposes the hole (the switch position is usually labeled SAVE or ERASE OFF). • When you're using the viewfinder to view playback, close the LCD panel. 1. Attach a power source and turn the POWER switch to VCR. • The power indicator lights up green. 2. Load the cassette. 3. Press the e (play) button to start playback. • To end playback, press the 3 (stop) button. • To wind the tape forwards, stop playback and press the 1 (fast forward) button. • To wind the tape backwards, stop playback and press the ` (rewind) button. • If the playback picture is rough (mosaic-like noise), clean the video heads using a Canon DVM-CL Digital Video Head Cleaning Cassette or a commercially available digital video head cleaning cassette. 22
-
 1
1 -
2
-
3
-
4
-
5
-
6
-
7
-
8
-
9
-
10
-
11
-
12
-
13
-
14
-
15
-
16
-
 17
17 -
 18
18 -
 19
19 -
 20
20 -
 21
21 -
 22
22 -
 23
23 -
 24
24 -
 25
25 -
 26
26 -
 27
27 -
28
-
29
-
30
-
31
-
32
-
33
-
34
-
35
-
36
-
37
-
38
-
39
-
40
-
41
-
42
-
43
-
44
-
45
-
46
-
47
-
48
-
49
-
50
-
51
-
52
-
53
-
54
-
55
-
56
-
57
-
58
-
59
-
60
-
61
-
62
-
63
-
64
-
65
-
66
-
67
-
68
-
69
-
70
-
71
-
72
-
73
-
74
-
75
-
76
-
77
-
78
-
79
-
80
-
81
-
82
-
83
-
84
-
85
-
86
-
87
-
88
-
89
-
90
-
91
-
92
-
93
-
94
-
95
-
96
-
97
-
98
-
99
-
100
-
101
-
102
-
103
-
104
-
105
-
106
-
107
-
108
-
109
-
110
-
111
-
112
-
113
-
114
-
115
-
116
-
117
 |
 |
