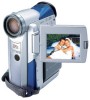
Canon 40MC Elura Instruction Manual - Page 83
Open the VCR menu, select AUDIO DUB.
 |
UPC - 013803014938
View all Canon 40MC manuals
Add to My Manuals
Save this manual to your list of manuals |
Page 83 highlights
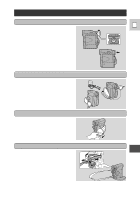
VCR • OFF • MOVIE • P.SCAN • PHOTO • VCPROWETR OFF MOVIE P.SCAN PHOTO E AUDIO DUB. (see p. 31) AUDIO DUB.••AUDIO IN 1. Load your recorded tape into the camcorder. 2. Turn the POWER switch to VCR. 3. Open the VCR menu, select AUDIO DUB. 4. Select AUDIO IN or MIC. IN with the selector dial and close the menu. 5. Set the tape to the point where you want to start audio dubbing. • You can use the `, 1, e/a and 3 buttons or special playback functions just as when in playback mode. 6. Press the pause button. • The camera becomes set to playback pause mode. 7. Press AUDIO DUB. on the wireless controller. • AUDIO DUB. and appear on the display. Editing 8. Press the pause button (and start play on the other audio device if AUDIO IN). • Audio dubbing starts. • If MIC. IN, direct your voice into the microphone. • changes to . 9. When you get to the point where you want to stop dubbing, press the stop button (and then stop play on the other audio device if AUDIO IN). • Audio dubbing stops and AUDIO DUB. disappears from the display. • The camera returns to stop mode. • You can also set zero set memory (p. 66) at the place you want to stop audio dubbing, then every time you return to that position, audio dubbing will cancel. • If instead of pressing STOP you press PAUSE, the camera will return to the playback pause mode. 83
-
 1
1 -
2
-
3
-
4
-
5
-
6
-
7
-
8
-
9
-
10
-
11
-
12
-
13
-
14
-
15
-
16
-
17
-
18
-
19
-
20
-
21
-
22
-
23
-
24
-
25
-
26
-
27
-
28
-
29
-
30
-
31
-
32
-
33
-
34
-
35
-
36
-
37
-
38
-
39
-
40
-
41
-
42
-
43
-
44
-
45
-
46
-
47
-
48
-
49
-
50
-
51
-
52
-
53
-
54
-
55
-
56
-
57
-
58
-
59
-
60
-
61
-
62
-
63
-
64
-
65
-
66
-
67
-
68
-
69
-
70
-
71
-
72
-
73
-
74
-
75
-
76
-
77
-
 78
78 -
 79
79 -
 80
80 -
 81
81 -
 82
82 -
 83
83 -
 84
84 -
 85
85 -
 86
86 -
 87
87 -
 88
88 -
89
-
90
-
91
-
92
-
93
-
94
-
95
-
96
-
97
-
98
-
99
-
100
-
101
-
102
-
103
-
104
-
105
-
106
-
107
-
108
-
109
-
110
-
111
-
112
-
113
-
114
-
115
-
116
-
117
 |
 |
