Canon 40MC Elura Instruction Manual - Page 81
On the VCR, play back the tape.
 |
UPC - 013803014938
View all Canon 40MC manuals
Add to My Manuals
Save this manual to your list of manuals |
Page 81 highlights
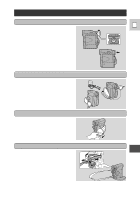
1. Connect the camera to the VCR, load recorded tapes into both the camcorder and VCR. E • Make sure the REC/SAVE tab on the tape has been slid to REC (closed position). 2. Turn the POWER switch to VCR. 3. On the VCR, locate a point three seconds before the scene to be inserted. Set the VCR in playback pause mode. 4. On the camera, locate the recording start point. Set the camera in playback pause mode. • You can use the camera's `, 1, e/a and 3 buttons or special playback functions just as when in playback mode. 5. Press the A/V INSERT button on the wireless controller. • A/V INSERT and 2a appear in the display. 6. On the VCR, play back the tape. 7. When you get to the starting point of the scene to be inserted on the tape, push the pause button on the camera. • A/V insert starts. • 2a changes to 2. 8. When you get to the point where you want to stop inserting, press the stop button of the camera. • Inserting stops and A/V INSERT disappears from the display. The camera returns to stop mode. • If instead of pressing stop you press pause, the camera returns to the A/V insert pause mode. • If you set the zero set memory at the position on the tape where you want to stop inserting, every time you return to that point, the camera will cancel its A/V inserting and enter stop mode. 9. Press the stop button of the VCR. Editing 81
-
 1
1 -
2
-
3
-
4
-
5
-
6
-
7
-
8
-
9
-
10
-
11
-
12
-
13
-
14
-
15
-
16
-
17
-
18
-
19
-
20
-
21
-
22
-
23
-
24
-
25
-
26
-
27
-
28
-
29
-
30
-
31
-
32
-
33
-
34
-
35
-
36
-
37
-
38
-
39
-
40
-
41
-
42
-
43
-
44
-
45
-
46
-
47
-
48
-
49
-
50
-
51
-
52
-
53
-
54
-
55
-
56
-
57
-
58
-
59
-
60
-
61
-
62
-
63
-
64
-
65
-
66
-
67
-
68
-
69
-
70
-
71
-
72
-
73
-
74
-
75
-
 76
76 -
 77
77 -
 78
78 -
 79
79 -
 80
80 -
 81
81 -
 82
82 -
 83
83 -
 84
84 -
 85
85 -
 86
86 -
87
-
88
-
89
-
90
-
91
-
92
-
93
-
94
-
95
-
96
-
97
-
98
-
99
-
100
-
101
-
102
-
103
-
104
-
105
-
106
-
107
-
108
-
109
-
110
-
111
-
112
-
113
-
114
-
115
-
116
-
117
 |
 |
