Canon PowerShot G5 Service Manual - Page 45
When a Problem Occurs, Adjustments must be performed after the part has been replaced. For details
 |
View all Canon PowerShot G5 manuals
Add to My Manuals
Save this manual to your list of manuals |
Page 45 highlights
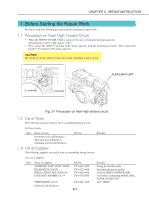
CHAPTER 2. TECHNICAL DESCRIPTION 3.2 When a Problem Occurs [Remedy] • Check for any abnormalities in the mounting of probable faulty parts or connector connections referring to the table below. • Try replacing probable faulty parts referring to the table below. [NOTE] • Adjustments must be performed after the part has been replaced. For details, see "CH.3 3. Adjustments" Problem (when an error code is not displayed) The camera does not work. The image is not displayed on the LCD Monitor. The image is not reversed even if the LCD Monitor is rotated. The photograph image is abnormal. The zoom does not function. The Display Panel (B/W LCD) is strange. The Built-in Flash does not fire. Cause and Probable Faulty Part DC/DC CONVERTER PCB ASS'Y MAIN PCB ASS'Y MAIN DIAL BRUSH TOP MODULE UNIT BATTERY BOX MAIN UNIT BATTERY EJECT SPRING POWER LEAD HINGE UNIT MAIN PCB ASS'Y EF FPC LCD PANEL LCD PCB ASS'Y BACK LIGHT UNIT HINGE UNIT LCD PCB ASS'Y MAIN PCB ASS'Y OPTICAL UNIT MAIN PCB ASS'Y OPTICAL UNIT MAIN PCB ASS'Y ZOOM BRUSH TOP MODULE UNIT B/W LCD PANEL CONTACT RUBBER TOP MODULE UNIT MAIN PCB ASS'Y STJ PCB ASS'Y DC/DC CONVERTER PCB ASS'Y TOP MODULE UNIT 2-7
-
 1
1 -
2
-
3
-
4
-
5
-
6
-
7
-
8
-
9
-
10
-
11
-
12
-
13
-
14
-
15
-
16
-
17
-
18
-
19
-
20
-
21
-
22
-
23
-
24
-
25
-
26
-
27
-
28
-
29
-
30
-
31
-
32
-
33
-
34
-
35
-
36
-
37
-
38
-
39
-
 40
40 -
 41
41 -
 42
42 -
 43
43 -
 44
44 -
 45
45 -
 46
46 -
 47
47 -
 48
48 -
 49
49 -
 50
50 -
51
-
52
-
53
-
54
-
55
-
56
-
57
-
58
-
59
-
60
-
61
-
62
-
63
-
64
-
65
-
66
-
67
-
68
-
69
-
70
-
71
-
72
-
73
-
74
-
75
-
76
-
77
-
78
-
79
-
80
-
81
-
82
-
83
-
84
-
85
-
86
-
87
-
88
-
89
-
90
-
91
-
92
-
93
-
94
-
95
-
96
-
97
-
98
-
99
-
100
-
101
-
102
-
103
-
104
-
105
-
106
-
107
-
108
-
109
-
110
-
111
-
112
-
113
-
114
-
115
-
116
-
117
-
118
-
119
-
120
-
121
-
122
-
123
-
124
-
125
-
126
-
127
-
128
-
129
-
130
-
131
-
132
-
133
-
134
-
135
-
136
-
137
-
138
-
139
-
140
-
141
-
142
-
143
-
144
-
145
-
146
-
147
-
148
-
149
-
150
-
151
-
152
-
153
-
154
-
155
-
156
-
157
-
158
-
159
-
160
-
161
 |
 |
