Canon PowerShot G5 Service Manual - Page 53
Rear Cover Unit
 |
View all Canon PowerShot G5 manuals
Add to My Manuals
Save this manual to your list of manuals |
Page 53 highlights
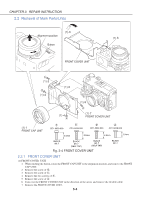
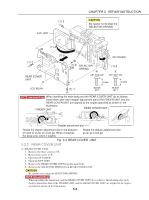
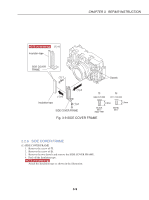
EVF UNIT (1)-2 f CHAPTER 3. REPAIR INSTRUCTION CAUTION Be careful not to drop the SELECTOR SPRING. (1)-4 (1)-1 e REAR COVER UNIT (1)-5 CF COVER (1)-6 SELECTOR SPRING e CD1-5030-000 (1)-3 f CD1-5031-000 4.0mm 4.5mm LCD BUSH (1)-1 e BLACK M1.7 BLACK M1.7 NOTE (Assembling) When installing the main body and the REAR COVER UNIT do as follows. Install them after each diopter adjustment dial of the FINDER UNIT and the REAR COVER UNIT are aligned to the angles specified as shown in the illustration. FINDER U. NIT REAR COVER UNIT A Diopter adjustment dial Rotate the diopter adjustment dial in the direction of mark A as far as it can go. When it reaches the deep end, return it slightly. Rotate the diopter adjustment dial as far as it can go. Fig. 3-5 REAR COVER UNIT 2.2.2 REAR COVER UNIT (1) REAR COVER UNIT 1. Remove the three screws of e. 2. Remove the screw of f. 3. Open the CF COVER. 4. Open the EVF UNIT. 5. Remove the REAR COVER UNIT from the main body. 6. Remove the SELECTOR SPRING from REAR COVER UNIT. CAUTION Be careful not to drop the SELECTOR SPRING. NOTE (Assembling) When installing the main body and the REAR COVER UNIT do as follows. Install them after each diopter adjustment dial of the FINDER UNIT and the REAR COVER UNIT are aligned to the angles specified as shown in the illustration. 3-5
-
 1
1 -
2
-
3
-
4
-
5
-
6
-
7
-
8
-
9
-
10
-
11
-
12
-
13
-
14
-
15
-
16
-
17
-
18
-
19
-
20
-
21
-
22
-
23
-
24
-
25
-
26
-
27
-
28
-
29
-
30
-
31
-
32
-
33
-
34
-
35
-
36
-
37
-
38
-
39
-
40
-
41
-
42
-
43
-
44
-
45
-
46
-
47
-
 48
48 -
 49
49 -
 50
50 -
 51
51 -
 52
52 -
 53
53 -
 54
54 -
 55
55 -
 56
56 -
 57
57 -
 58
58 -
59
-
60
-
61
-
62
-
63
-
64
-
65
-
66
-
67
-
68
-
69
-
70
-
71
-
72
-
73
-
74
-
75
-
76
-
77
-
78
-
79
-
80
-
81
-
82
-
83
-
84
-
85
-
86
-
87
-
88
-
89
-
90
-
91
-
92
-
93
-
94
-
95
-
96
-
97
-
98
-
99
-
100
-
101
-
102
-
103
-
104
-
105
-
106
-
107
-
108
-
109
-
110
-
111
-
112
-
113
-
114
-
115
-
116
-
117
-
118
-
119
-
120
-
121
-
122
-
123
-
124
-
125
-
126
-
127
-
128
-
129
-
130
-
131
-
132
-
133
-
134
-
135
-
136
-
137
-
138
-
139
-
140
-
141
-
142
-
143
-
144
-
145
-
146
-
147
-
148
-
149
-
150
-
151
-
152
-
153
-
154
-
155
-
156
-
157
-
158
-
159
-
160
-
161
 |
 |
