Canon PowerShot G5 Service Manual - Page 62
Flash/jack Unit, Speaker Unit, Note1 Assembling
 |
View all Canon PowerShot G5 manuals
Add to My Manuals
Save this manual to your list of manuals |
Page 62 highlights
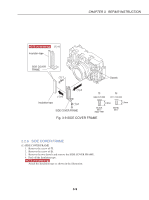
CHAPTER 3. REPAIR INSTRUCTION (1)-2 NOTE1 (Assembling) (1)-2 Red White FLASH/JACK UNIT DC/DC CONVERTER PCB ASS'Y (1)-2 (1)-2 (1)-1 MAIN/FLASH a (1)-3 FPC SPEAKER CAUTION UNIT Be careful not to drop the SPEAKER BUSH. (2)-2 FLASH/JACK UNIT Dowels (1)-6 (2)-1 SPEAKER BUSH NOTE3 (Assembling) (2)-2 (1)-4 NOTE2 (Assembling) (2)-2 Double-sided adhesive tape a CB1-1998-000 (1)-5 q q XA4-9170-359 3.0mm 3.5mm METAL M1.7 BLACK M1.7 (SELF TAP) Fig. 3-14 FLASH/JACK UNIT, SPEAKER UNIT 2.2.11 FLASH/JACK UNIT, SPEAKER UNIT (1) FLASH/JACK UNIT 1. Remove the MAIN/FLASH FPC. 2. Remove the cable of the BAT BOX UNIT and two cables of the FLASH/JACK UNIT. 3. Remove the three screws of a. 4. Remove the cable of the SPEAKER UNIT. 5. Remove the two screws of q. 6. Remove the two dowels and raise FLASH/JACK UNIT. Then push out the FLASH/JACK UNIT to the front and remove the FLASH/JACK UNIT. NOTE1 (Assembling) Insert the cable coming from the BAT BOX UNIT to the red connector. Insert the cable coming from the FLASH/JACK UNIT to the white connector. (2) SPEAKER UNIT 1. Remove the SPEAKER BUSH. 2. Remove the SPEAKER UNIT from the FLASH/JACK UNIT. CAUTION Be careful not to drop the SPEAKER BUSH. NOTE2 (Assembling) Attach the double-sided adhesive tape at the position as shown in the illustration and install the SPEAKER UNIT. NOTE3 (Assembling) Route the cable of the SPEAKER UNIT as shown in the illustration. 3-14
-
 1
1 -
2
-
3
-
4
-
5
-
6
-
7
-
8
-
9
-
10
-
11
-
12
-
13
-
14
-
15
-
16
-
17
-
18
-
19
-
20
-
21
-
22
-
23
-
24
-
25
-
26
-
27
-
28
-
29
-
30
-
31
-
32
-
33
-
34
-
35
-
36
-
37
-
38
-
39
-
40
-
41
-
42
-
43
-
44
-
45
-
46
-
47
-
48
-
49
-
50
-
51
-
52
-
53
-
54
-
55
-
56
-
 57
57 -
 58
58 -
 59
59 -
 60
60 -
 61
61 -
 62
62 -
 63
63 -
 64
64 -
 65
65 -
 66
66 -
 67
67 -
68
-
69
-
70
-
71
-
72
-
73
-
74
-
75
-
76
-
77
-
78
-
79
-
80
-
81
-
82
-
83
-
84
-
85
-
86
-
87
-
88
-
89
-
90
-
91
-
92
-
93
-
94
-
95
-
96
-
97
-
98
-
99
-
100
-
101
-
102
-
103
-
104
-
105
-
106
-
107
-
108
-
109
-
110
-
111
-
112
-
113
-
114
-
115
-
116
-
117
-
118
-
119
-
120
-
121
-
122
-
123
-
124
-
125
-
126
-
127
-
128
-
129
-
130
-
131
-
132
-
133
-
134
-
135
-
136
-
137
-
138
-
139
-
140
-
141
-
142
-
143
-
144
-
145
-
146
-
147
-
148
-
149
-
150
-
151
-
152
-
153
-
154
-
155
-
156
-
157
-
158
-
159
-
160
-
161
 |
 |
