Canon PowerShot G5 Service Manual - Page 60
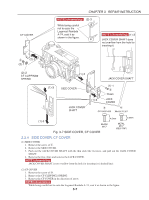
Evf Unit, Sub Frame, Fig. 3-12 Evf Unit. Sub Frame
 |
View all Canon PowerShot G5 manuals
Add to My Manuals
Save this manual to your list of manuals |
Page 60 highlights
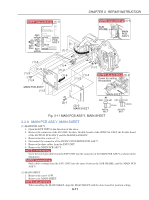
CHAPTER 3. REPAIR INSTRUCTION Dowels SUB FRAME EVF UNIT (2)-1 c (2)-2 (1)-1 c (1)-4 NOTE (Assembling) (1)-3 (1)-5 (1)-3 i(1)-2 (2)-1 c Claws HINGE COVER c CD1-3798-000 i CD1-4983-000 3.0mm 1.6mm METAL M1.7 SILVER M1.7 Fig. 3-12 EVF UNIT. SUB FRAME 2.2.9 EVF UNIT, SUB FRAME (1) EVF UNIT 1. Rotate the EVF UNIT by the 90 degrees in the direction of the arrow. 2. Remove the two screws of i. 3. Remove the two claws and remove the HINGE COVER. 4. Remove the two screws of c. 5. Remove the EVF UNIT. NOTE (Assembling) When installing HINGE COVER, take out the two 8-pin cables from the space between the HINGE COVER and HINGE UNIT as shown in the illustration. (2) SUB FRAME 1. Remove the two screws of c. 2. Remove the two dowels and remove the SUB FRAME. 3-12
-
 1
1 -
2
-
3
-
4
-
5
-
6
-
7
-
8
-
9
-
10
-
11
-
12
-
13
-
14
-
15
-
16
-
17
-
18
-
19
-
20
-
21
-
22
-
23
-
24
-
25
-
26
-
27
-
28
-
29
-
30
-
31
-
32
-
33
-
34
-
35
-
36
-
37
-
38
-
39
-
40
-
41
-
42
-
43
-
44
-
45
-
46
-
47
-
48
-
49
-
50
-
51
-
52
-
53
-
54
-
 55
55 -
 56
56 -
 57
57 -
 58
58 -
 59
59 -
 60
60 -
 61
61 -
 62
62 -
 63
63 -
 64
64 -
 65
65 -
66
-
67
-
68
-
69
-
70
-
71
-
72
-
73
-
74
-
75
-
76
-
77
-
78
-
79
-
80
-
81
-
82
-
83
-
84
-
85
-
86
-
87
-
88
-
89
-
90
-
91
-
92
-
93
-
94
-
95
-
96
-
97
-
98
-
99
-
100
-
101
-
102
-
103
-
104
-
105
-
106
-
107
-
108
-
109
-
110
-
111
-
112
-
113
-
114
-
115
-
116
-
117
-
118
-
119
-
120
-
121
-
122
-
123
-
124
-
125
-
126
-
127
-
128
-
129
-
130
-
131
-
132
-
133
-
134
-
135
-
136
-
137
-
138
-
139
-
140
-
141
-
142
-
143
-
144
-
145
-
146
-
147
-
148
-
149
-
150
-
151
-
152
-
153
-
154
-
155
-
156
-
157
-
158
-
159
-
160
-
161
 |
 |
