Canon PowerShot G5 Service Manual - Page 64
Optical Unit, Finder Unit, Fig. 3-16 Optical Unit
 |
View all Canon PowerShot G5 manuals
Add to My Manuals
Save this manual to your list of manuals |
Page 64 highlights
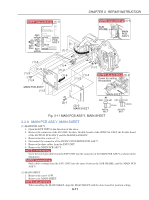
CHAPTER 3. REPAIR INSTRUCTION (1)-4 (1)-5 Flat-head screwdriver (1)-6 LED HOLDER (1)-6 (1)-6 FINDER UNIT q (1)-1 (1)-2 Dowel NOTE (Assembling) LED HOLDER (1)-3 Claw Coat it with the Dia bond 1663G (1)-7 LED HOLDER (1)-6 OPTICAL UNIT Fig. 3-16 OPTICAL UNIT, FINDER UNIT q XA4-9170-359 3.5mm BLACK M1.7 (SELF TAP) 2.2.13 OPTICAL UNIT, FINDER UNIT (1) OPTICAL UNIT, FINDER UNIT 1. Remove the two screws of q. 2. Slant the FINDER UNIT in the direction of the arrow, and remove the dowel. 3. Remove the claw on the opposite side. 4. Turn over the FINDER UNIT in the direction of the arrow. 5. Push out the LED HOLDER with the use of flat-head screwdriver. 6. Turn over the FINDER UNIT again, pull out the LED HOLDER and remove the FINDER UNIT from the OPTICAL UNIT. 7. Peel off the portion fixed by the Dia bond, and remove the LED HOLDER from the flexible board. NOTE (Assembling) Align the two dowels of the LED HOLDER with the position setting hole of the flexible board and coat it with the Dia bond 1663G as shown in the figure. 3-16
-
 1
1 -
2
-
3
-
4
-
5
-
6
-
7
-
8
-
9
-
10
-
11
-
12
-
13
-
14
-
15
-
16
-
17
-
18
-
19
-
20
-
21
-
22
-
23
-
24
-
25
-
26
-
27
-
28
-
29
-
30
-
31
-
32
-
33
-
34
-
35
-
36
-
37
-
38
-
39
-
40
-
41
-
42
-
43
-
44
-
45
-
46
-
47
-
48
-
49
-
50
-
51
-
52
-
53
-
54
-
55
-
56
-
57
-
58
-
 59
59 -
 60
60 -
 61
61 -
 62
62 -
 63
63 -
 64
64 -
 65
65 -
 66
66 -
 67
67 -
 68
68 -
 69
69 -
70
-
71
-
72
-
73
-
74
-
75
-
76
-
77
-
78
-
79
-
80
-
81
-
82
-
83
-
84
-
85
-
86
-
87
-
88
-
89
-
90
-
91
-
92
-
93
-
94
-
95
-
96
-
97
-
98
-
99
-
100
-
101
-
102
-
103
-
104
-
105
-
106
-
107
-
108
-
109
-
110
-
111
-
112
-
113
-
114
-
115
-
116
-
117
-
118
-
119
-
120
-
121
-
122
-
123
-
124
-
125
-
126
-
127
-
128
-
129
-
130
-
131
-
132
-
133
-
134
-
135
-
136
-
137
-
138
-
139
-
140
-
141
-
142
-
143
-
144
-
145
-
146
-
147
-
148
-
149
-
150
-
151
-
152
-
153
-
154
-
155
-
156
-
157
-
158
-
159
-
160
-
161
 |
 |
