Canon PowerShot G5 Service Manual - Page 49
Before Starting the Repair Work, Precaution on Flash High Tension Circuit, List of Tools
 |
View all Canon PowerShot G5 manuals
Add to My Manuals
Save this manual to your list of manuals |
Page 49 highlights
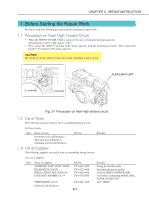
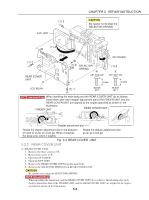
CHAPTER 3. REPAIR INSTRUCTION 1. Before Starting the Repair Work Be sure to read the following precaution before starting the repair work. 1.1 Precaution on Flash High Tension Circuit • When the FRONT COVER UNIT is removed, be sure to discharge the main capacitor. (Discharging resistor: 1 kΩ, approx. 5 W.) • First contact the GND terminal of the main capacitor with the discharging resistor. Then contact the positive terminal of the main capacitor. CAUTION: Be careful of electric shock because the circuit is the high tension circuit. FLASH/JACK UNIT + terminal - terminal Fig. 3-1 Precaution on flash high tension circuit 1.2 List of Tools The following tools are used for the re-assembling during service. (1) List of tools New Name of tools Screwdriver (Local Purchase) Tweezers (Local Purchase) Soldering iron (Local Purchase) Part No. Remarks 1.3 List of Supplies The following supplies are used for the re-assembling during service. (1) List of supplies New Name of supplies ADHESIVE TAPE, SONY T4000 DIA BOND No.1663G INSULATION TAPE 3M No.56 LOGENEST RAMBDA A-74 Part No. CY4-6012-000 CY9-8129-000 CY4-6018-000 CY9-8102-000 THREE BOND 1401C Solder (Local Purchase) CY9-8011-000 3-1 Remarks Fixing the flexible cable Attaching the parts together Used for SIDE COVER FRAME Used when exchanging MODE DIAL, ZOOM LEVER UNIT ACC. SHOE
-
 1
1 -
2
-
3
-
4
-
5
-
6
-
7
-
8
-
9
-
10
-
11
-
12
-
13
-
14
-
15
-
16
-
17
-
18
-
19
-
20
-
21
-
22
-
23
-
24
-
25
-
26
-
27
-
28
-
29
-
30
-
31
-
32
-
33
-
34
-
35
-
36
-
37
-
38
-
39
-
40
-
41
-
42
-
43
-
 44
44 -
 45
45 -
 46
46 -
 47
47 -
 48
48 -
 49
49 -
 50
50 -
 51
51 -
 52
52 -
 53
53 -
 54
54 -
55
-
56
-
57
-
58
-
59
-
60
-
61
-
62
-
63
-
64
-
65
-
66
-
67
-
68
-
69
-
70
-
71
-
72
-
73
-
74
-
75
-
76
-
77
-
78
-
79
-
80
-
81
-
82
-
83
-
84
-
85
-
86
-
87
-
88
-
89
-
90
-
91
-
92
-
93
-
94
-
95
-
96
-
97
-
98
-
99
-
100
-
101
-
102
-
103
-
104
-
105
-
106
-
107
-
108
-
109
-
110
-
111
-
112
-
113
-
114
-
115
-
116
-
117
-
118
-
119
-
120
-
121
-
122
-
123
-
124
-
125
-
126
-
127
-
128
-
129
-
130
-
131
-
132
-
133
-
134
-
135
-
136
-
137
-
138
-
139
-
140
-
141
-
142
-
143
-
144
-
145
-
146
-
147
-
148
-
149
-
150
-
151
-
152
-
153
-
154
-
155
-
156
-
157
-
158
-
159
-
160
-
161
 |
 |
