Canon PowerShot G5 Service Manual - Page 63
Dc/dc Converter Pcb Ass, Y, Optical Unit/finder Unit, Note1 Assembling
 |
View all Canon PowerShot G5 manuals
Add to My Manuals
Save this manual to your list of manuals |
Page 63 highlights
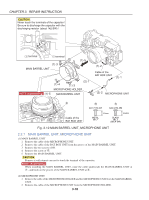
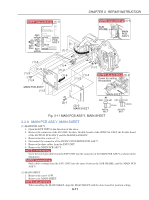
CHAPTER 3. REPAIR INSTRUCTION NOTE2 (Assembling) (2)-5 Install the CCD SPRING as shown in the illustration. CCD MAIN FRAME SPRING CAUTION Be careful not to drop the CCD SPRING. CCD SPRING (2)-5 NOTE1 (Assembling) (2)-2 ZOOM GND PLATE Setting the position for reassembling (2)-1 q (2)-2 ZOOM GND PLATE q (2)-3 (2)-4 OPTICAL UNIT/ FINDER UNIT (1)-2 DC/DC CONVERTER PCB ASS'Y a q CB1-1998-000 XA4-9170-359 a (1)-1 3.0mm 3.5mm METAL M1.7 BLACK M1.7 (SELF TAP) Fig. 3-15 DC/DC CONVERTER PCB ASS'Y, OPTICAL UNIT/FINDER UNIT 2.2.12 DC/DC CONVERTER PCB ASS'Y, OPTICAL UNIT/FINDER UNIT (1) DC/DC CONVERTER PCB ASS'Y 1. Remove the three screws of a. 2. Slant the DC/DC CONVERTER PCB ASS'Y in the direction of the arrow, and remove it. (2) OPTICAL UNIT/FINDER UNIT 1. Remove the screw of q. 2. Remove the ZOOM GND PLATE. 3. Remove the two screws of q. 4. Remove the OPTICAL UNIT/FINDER UNIT to the direction of the arrow. 5. Remove the CCD SPRING from the OPTICAL UNIT/FINDER UNIT. CAUTION Be careful not to drop the CCD SPRING. NOTE1 (Assembling) When installing the ZOOM GND PLATE, align it with the mark used for position setting of the MAIN FRAME. NOTE2 (Assembling) Insert the CCD SPRING in the OPTICAL UNIT/FINDER UNIT, and hold it down with the MAIN FRAME. 3-15
-
 1
1 -
2
-
3
-
4
-
5
-
6
-
7
-
8
-
9
-
10
-
11
-
12
-
13
-
14
-
15
-
16
-
17
-
18
-
19
-
20
-
21
-
22
-
23
-
24
-
25
-
26
-
27
-
28
-
29
-
30
-
31
-
32
-
33
-
34
-
35
-
36
-
37
-
38
-
39
-
40
-
41
-
42
-
43
-
44
-
45
-
46
-
47
-
48
-
49
-
50
-
51
-
52
-
53
-
54
-
55
-
56
-
57
-
 58
58 -
 59
59 -
 60
60 -
 61
61 -
 62
62 -
 63
63 -
 64
64 -
 65
65 -
 66
66 -
 67
67 -
 68
68 -
69
-
70
-
71
-
72
-
73
-
74
-
75
-
76
-
77
-
78
-
79
-
80
-
81
-
82
-
83
-
84
-
85
-
86
-
87
-
88
-
89
-
90
-
91
-
92
-
93
-
94
-
95
-
96
-
97
-
98
-
99
-
100
-
101
-
102
-
103
-
104
-
105
-
106
-
107
-
108
-
109
-
110
-
111
-
112
-
113
-
114
-
115
-
116
-
117
-
118
-
119
-
120
-
121
-
122
-
123
-
124
-
125
-
126
-
127
-
128
-
129
-
130
-
131
-
132
-
133
-
134
-
135
-
136
-
137
-
138
-
139
-
140
-
141
-
142
-
143
-
144
-
145
-
146
-
147
-
148
-
149
-
150
-
151
-
152
-
153
-
154
-
155
-
156
-
157
-
158
-
159
-
160
-
161
 |
 |
