Canon PowerShot G5 Service Manual - Page 52
Removal of Main Parts/Units, FRONT COVER UNIT
 |
View all Canon PowerShot G5 manuals
Add to My Manuals
Save this manual to your list of manuals |
Page 52 highlights
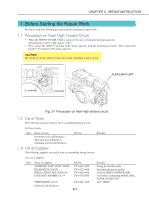
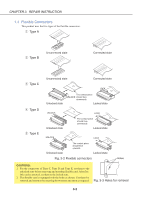
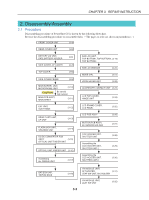
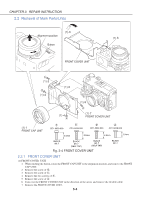
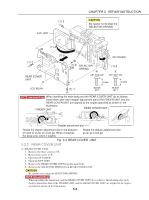
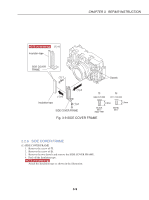
CHAPTER 3. REPAIR INSTRUCTION 2.2 Removal of Main Parts/Units Alignment position (1)-6 Button (1)-6 FRONT COVER UNIT h (1)-3 g (1)-2 (1)-6 (1)-4 e (1)-5 d (1)-7 FRONT COVER UNIT (1)-1 FRONT CAP UNIT e CD1-5030-000 h CD1-5033-000 g CD1-5032-000 d CD1-5028-000 4.0mm 5.5mm 4.0mm 3.0mm BLACK M1.7 BLACK M1.7 (SELF TAP) BLACK M1.7 (SELF TAP) Fig. 3-4 FRONT COVER UNIT BLACK M1.7 2.2.1 FRONT COVER UNIT (1) FRONT COVER UNIT 1. While pushing the button, rotate the FRONT CAP UNIT to the alignment position, and remove the FRONT CAP UNIT. 2. Remove the screw of g. 3. Remove the screw of h. 4. Remove the two screws of e. 5. Remove the screw of d. 6. Turn over the FRONT COVER UNIT in the direction of the arrow and remove the flexible cable. 7. Remove the FRONT COVER UNIT. 3-4
-
 1
1 -
2
-
3
-
4
-
5
-
6
-
7
-
8
-
9
-
10
-
11
-
12
-
13
-
14
-
15
-
16
-
17
-
18
-
19
-
20
-
21
-
22
-
23
-
24
-
25
-
26
-
27
-
28
-
29
-
30
-
31
-
32
-
33
-
34
-
35
-
36
-
37
-
38
-
39
-
40
-
41
-
42
-
43
-
44
-
45
-
46
-
 47
47 -
 48
48 -
 49
49 -
 50
50 -
 51
51 -
 52
52 -
 53
53 -
 54
54 -
 55
55 -
 56
56 -
 57
57 -
58
-
59
-
60
-
61
-
62
-
63
-
64
-
65
-
66
-
67
-
68
-
69
-
70
-
71
-
72
-
73
-
74
-
75
-
76
-
77
-
78
-
79
-
80
-
81
-
82
-
83
-
84
-
85
-
86
-
87
-
88
-
89
-
90
-
91
-
92
-
93
-
94
-
95
-
96
-
97
-
98
-
99
-
100
-
101
-
102
-
103
-
104
-
105
-
106
-
107
-
108
-
109
-
110
-
111
-
112
-
113
-
114
-
115
-
116
-
117
-
118
-
119
-
120
-
121
-
122
-
123
-
124
-
125
-
126
-
127
-
128
-
129
-
130
-
131
-
132
-
133
-
134
-
135
-
136
-
137
-
138
-
139
-
140
-
141
-
142
-
143
-
144
-
145
-
146
-
147
-
148
-
149
-
150
-
151
-
152
-
153
-
154
-
155
-
156
-
157
-
158
-
159
-
160
-
161
 |
 |
