Canon PowerShot G5 Service Manual - Page 59
MAIN PCB ASS, Y, MAIN SHEET, NOTE1 Assembling
 |
View all Canon PowerShot G5 manuals
Add to My Manuals
Save this manual to your list of manuals |
Page 59 highlights
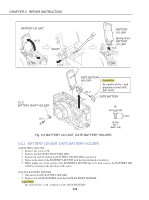
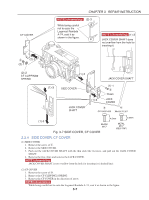
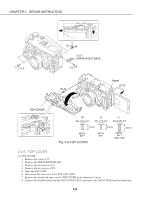
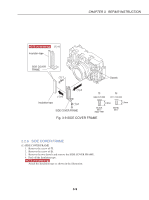
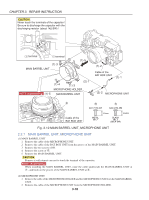
NOTE1 (Assembling) (1)-5 4pin yellow white 8pin blue blue 8pin white yellow MAIN PCB ASS'Y (1)-1 (1)-2 CHAPTER 3. REPAIR INSTRUCTION NOTE2 (Assembling) (1)-6 SUB FRAME MAIN PCB ASS'Y (1)-5 (1)-5 (1)-5 j (1)-3 (1)-4 (1)-2 (1)-6 (1)-2 (1)-2 (1)-2 NOTE3 (Assembling) (2)-2 Dowel for setting the position MAIN PCB ASS'Y (1)-2 m (2)-1 (2)-2 MAIN SHEET MAIN SHEET m j XA1-7170-307 CD1-4987-000 3.0mm 3.0mm METAL M1.7 SILVER M1.7 Fig. 3-11 MAIN PCB ASS'Y, MAIN SHEET 2.2.8 MAIN PCB ASS'Y, MAIN SHEET (1) MAIN PCB ASS'Y 1. Open the EVF UNIT in the direction of the arrow. 2. Remove the connector of the CF UNIT, the three flexible boards of the OPTICAL UNIT, the flexible board of the BUTTON PCB ASS'Y and the MAIN/FLASH FPC. 3. Remove the two screws of j. 4. Disconnect the connector of the DC/DC CONVERTER PCB ASS'Y. 5. Remove the three cables from the EVF UNIT. 6. Remove the MAIN PCB ASS'Y. NOTE1 (Assembling) Insert the two 8-pin cables from the EVF UNIT into the connector of the MAIN PCB ASS'Y as shown in the illustration. NOTE2 (Assembling) Push cables coming from the EVF UNIT into the space between the SUB FRAME, and the MAIN PCB ASS'Y. (2) MAIN SHEET 1. Remove the screw of m. 2. Remove the MAIN SHEET. NOTE3 (Assembling) When installing the MAIN SHEET, align the MAIN SHEET with the dowel used for position setting. 3-11
-
 1
1 -
2
-
3
-
4
-
5
-
6
-
7
-
8
-
9
-
10
-
11
-
12
-
13
-
14
-
15
-
16
-
17
-
18
-
19
-
20
-
21
-
22
-
23
-
24
-
25
-
26
-
27
-
28
-
29
-
30
-
31
-
32
-
33
-
34
-
35
-
36
-
37
-
38
-
39
-
40
-
41
-
42
-
43
-
44
-
45
-
46
-
47
-
48
-
49
-
50
-
51
-
52
-
53
-
 54
54 -
 55
55 -
 56
56 -
 57
57 -
 58
58 -
 59
59 -
 60
60 -
 61
61 -
 62
62 -
 63
63 -
 64
64 -
65
-
66
-
67
-
68
-
69
-
70
-
71
-
72
-
73
-
74
-
75
-
76
-
77
-
78
-
79
-
80
-
81
-
82
-
83
-
84
-
85
-
86
-
87
-
88
-
89
-
90
-
91
-
92
-
93
-
94
-
95
-
96
-
97
-
98
-
99
-
100
-
101
-
102
-
103
-
104
-
105
-
106
-
107
-
108
-
109
-
110
-
111
-
112
-
113
-
114
-
115
-
116
-
117
-
118
-
119
-
120
-
121
-
122
-
123
-
124
-
125
-
126
-
127
-
128
-
129
-
130
-
131
-
132
-
133
-
134
-
135
-
136
-
137
-
138
-
139
-
140
-
141
-
142
-
143
-
144
-
145
-
146
-
147
-
148
-
149
-
150
-
151
-
152
-
153
-
154
-
155
-
156
-
157
-
158
-
159
-
160
-
161
 |
 |
