Canon PowerShot SX10 IS Software Starter Guide - Page 28
Viewer Window - red
 |
View all Canon PowerShot SX10 IS manuals
Add to My Manuals
Save this manual to your list of manuals |
Page 28 highlights
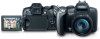
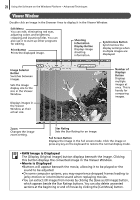
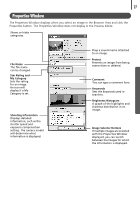
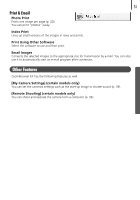
26 Using the Software on the Windows Platform - Advanced Techniques Viewer Window Double-click an image in the Browser Area to display it in the Viewer Window. Edit Menu You can edit, eliminating red eyes, adjusting colors and brightness, cropping and inputting titles. You can also use it to start up other programs for editing. Print Button Prints the displayed image. Shooting Information Display Button Displays image shooting information. Synchronize Button Synchronizes the display settings when multiple images are displayed. Image Selector Button Switches between images. Sets the image display size to the size in the Viewer Window. Displays images in the Viewer Window at their actual size. Number of Displays Button Displays multiple images at once. This is handy for comparing images. Zoom Changes the image zoom setting. Star Rating Sets the Star Rating for an image. Full Screen Button Displays the image in the full screen mode. Click the image or press any key on the keyboard to restore the normal display mode. • RAW Image is Displayed The [Display Original Image] button displays beneath the image. Clicking this button displays the converted image in the Viewer Window. • Movie is Displayed •Buttons will appear beneath the movie, allowing it to be played or the sound to be adjusted. •On some computer systems, you may experience dropped frames leading to jerky motion or intermittent sound when replaying movies. •You can extract still images from movies by clicking the [Save as still image] button, which appears beside the Star Ratings buttons. You can also delete unwanted sections at the beginning or end of movies by clicking the [Cut Movie] button.
-
 1
1 -
2
-
3
-
4
-
5
-
6
-
7
-
8
-
9
-
10
-
11
-
12
-
13
-
14
-
15
-
16
-
17
-
18
-
19
-
20
-
21
-
22
-
 23
23 -
 24
24 -
 25
25 -
 26
26 -
 27
27 -
 28
28 -
 29
29 -
 30
30 -
 31
31 -
 32
32 -
 33
33 -
34
-
35
-
36
-
37
-
38
-
39
-
40
-
41
-
42
-
43
-
44
-
45
-
46
-
47
-
48
-
49
-
50
-
51
-
52
-
53
-
54
-
55
-
56
-
57
-
58
-
59
-
60
-
61
-
62
-
63
-
64
-
65
-
66
-
67
-
68
-
69
-
70
-
71
-
72
-
73
-
74
-
75
-
76
-
77
-
78
-
79
-
80
-
81
-
82
-
83
 |
 |