Canon PowerShot SX10 IS Software Starter Guide - Page 50
Acquired Images]
 |
View all Canon PowerShot SX10 IS manuals
Add to My Manuals
Save this manual to your list of manuals |
Page 50 highlights
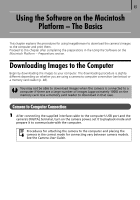
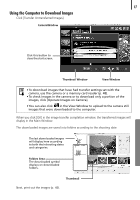
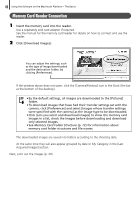
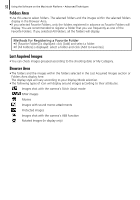
48 Using the Software on the Macintosh Platform - The Basics Memory Card Reader Connection 1 Insert the memory card into the reader. Use a separately sold card adapter if required. See the manual for the memory card reader for details on how to connect and use the reader. 2 Click [Download Images]. You can adjust the settings, such as the type of image downloaded and the destination folder, by clicking [Preferences]. If the window above does not open, click the [CameraWindow] icon in the Dock (the bar at the bottom of the desktop). • By the default settings, all images are downloaded to the [Pictures] folder. • To download images that have had their transfer settings set with the camera, click [Preferences] and select [Images whose transfer settings were specified with the camera] as the image type to be downloaded. • Click [Lets you select and download images] to show the memory card images in a list, check the images before downloading and download only selected images. • See Memory Card Folder Structure (p. 72) for information about memory card folder structures and file names. The downloaded images are saved into folders according to the shooting date. At the same time they will also appear grouped by date or My Category in the [Last Acquired Images] section. Next, print out the images (p. 49).
-
 1
1 -
2
-
3
-
4
-
5
-
6
-
7
-
8
-
9
-
10
-
11
-
12
-
13
-
14
-
15
-
16
-
17
-
18
-
19
-
20
-
21
-
22
-
23
-
24
-
25
-
26
-
27
-
28
-
29
-
30
-
31
-
32
-
33
-
34
-
35
-
36
-
37
-
38
-
39
-
40
-
41
-
42
-
43
-
44
-
 45
45 -
 46
46 -
 47
47 -
 48
48 -
 49
49 -
 50
50 -
 51
51 -
 52
52 -
 53
53 -
 54
54 -
 55
55 -
56
-
57
-
58
-
59
-
60
-
61
-
62
-
63
-
64
-
65
-
66
-
67
-
68
-
69
-
70
-
71
-
72
-
73
-
74
-
75
-
76
-
77
-
78
-
79
-
80
-
81
-
82
-
83
 |
 |
