Canon PowerShot SX10 IS PowerShot SX10 IS Camera User Guide - Page 14
Close the cover, and slide until it clicks - lens cap
 |
View all Canon PowerShot SX10 IS manuals
Add to My Manuals
Save this manual to your list of manuals |
Page 14 highlights
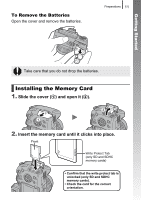
Getting Started 12 Preparations 3. Close the cover (c) and slide until it clicks (d). Ensure that the memory card is correctly oriented before inserting it in the camera. Inserting it backward may cause the camera to fail to recognize the memory card or to malfunction. To Remove the Memory Card Push the memory card with your finger until the memory card clicks and then release it. Attaching/Removing the Lens Cap Press both sides of the lens cap (a), and remove it (b). • To avoid losing the lens cap, we recommend clipping it to the neck strap after removing it (p. 13). • When not in use, store the camera with the lens cap attached. Be sure to remove the lens cap before turning on the camera.
-
 1
1 -
2
-
3
-
4
-
5
-
6
-
7
-
8
-
 9
9 -
 10
10 -
 11
11 -
 12
12 -
 13
13 -
 14
14 -
 15
15 -
 16
16 -
 17
17 -
 18
18 -
 19
19 -
20
-
21
-
22
-
23
-
24
-
25
-
26
-
27
-
28
-
29
-
30
-
31
-
32
-
33
-
34
-
35
-
36
-
37
-
38
-
39
-
40
-
41
-
42
-
43
-
44
-
45
-
46
-
47
-
48
-
49
-
50
-
51
-
52
-
53
-
54
-
55
-
56
-
57
-
58
-
59
-
60
-
61
-
62
-
63
-
64
-
65
-
66
-
67
-
68
-
69
-
70
-
71
-
72
-
73
-
74
-
75
-
76
-
77
-
78
-
79
-
80
-
81
-
82
-
83
-
84
-
85
-
86
-
87
-
88
-
89
-
90
-
91
-
92
-
93
-
94
-
95
-
96
-
97
-
98
-
99
-
100
-
101
-
102
-
103
-
104
-
105
-
106
-
107
-
108
-
109
-
110
-
111
-
112
-
113
-
114
-
115
-
116
-
117
-
118
-
119
-
120
-
121
-
122
-
123
-
124
-
125
-
126
-
127
-
128
-
129
-
130
-
131
-
132
-
133
-
134
-
135
-
136
-
137
-
138
-
139
-
140
-
141
-
142
-
143
-
144
-
145
-
146
-
147
-
148
-
149
-
150
-
151
-
152
-
153
-
154
-
155
-
156
-
157
-
158
-
159
-
160
-
161
-
162
-
163
-
164
-
165
-
166
-
167
-
168
-
169
-
170
-
171
-
172
-
173
-
174
-
175
-
176
-
177
-
178
-
179
-
180
-
181
-
182
-
183
-
184
-
185
-
186
-
187
-
188
-
189
-
190
-
191
-
192
-
193
-
194
-
195
-
196
-
197
-
198
-
199
-
200
-
201
-
202
-
203
-
204
-
205
-
206
-
207
-
208
-
209
-
210
-
211
-
212
-
213
-
214
-
215
-
216
-
217
-
218
-
219
-
220
-
221
-
222
-
223
-
224
-
225
-
226
-
227
-
228
-
229
-
230
-
231
-
232
-
233
-
234
-
235
-
236
-
237
-
238
-
239
-
240
-
241
-
242
-
243
-
244
-
245
-
246
-
247
-
248
-
249
-
250
-
251
-
252
-
253
-
254
-
255
-
256
-
257
-
258
-
259
-
260
-
261
-
262
-
263
-
264
-
265
-
266
-
267
-
268
-
269
-
270
-
271
-
272
-
273
-
274
-
275
-
276
-
277
-
278
-
279
-
280
-
281
-
282
-
283
-
284
-
285
-
286
-
287
-
288
-
289
-
290
-
291
-
292
 |
 |

Preparations
12
Getting Started
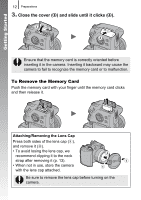
3.
Close the cover (
c
) and slide until it clicks (
d
).
To Remove the Memory Card
Push the memory card with your finger until the memory card clicks
and then release it.
Ensure that the memory card is correctly oriented before
inserting it in the camera. Inserting it backward may cause the
camera to fail to recognize the memory card or to malfunction.
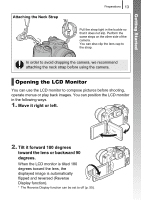
Attaching/Removing the Lens Cap
Press both sides of the lens cap (
a
),
and remove it (
b
).
• To avoid losing the lens cap, we
recommend clipping it to the neck
strap after removing it (p. 13).
• When not in use, store the camera
with the lens cap attached.
Be sure to remove the lens cap before turning on the
camera.