Cisco ASR1006-10G-SEC/K9 Installation Guide - Page 7
Guidelines for an Equipment Shelf or Tabletop Installation
 |
View all Cisco ASR1006-10G-SEC/K9 manuals
Add to My Manuals
Save this manual to your list of manuals |
Page 7 highlights
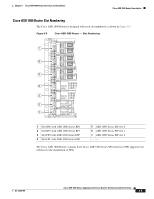
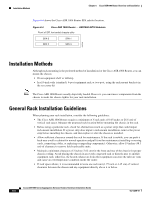
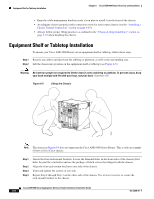
Chapter 6 Cisco ASR 1006 Router Overview and Installation Guidelines for an Equipment Shelf or Tabletop Installation Caution Depending on your installation and co-located equipment power dissipation, it is recommended to have some air gap between chassis, if space allows, to reduce residual heating from one chassis to another. • Always install heavier equipment in the lower half of a rack to maintain a low center of gravity to prevent the rack from falling over. • Install and use the cable-management brackets included with the Cisco ASR 1006 Router to keep cables organized and out of the way of the cards and processors. Ensure that cables from other equipment already installed in the rack do not impair access to the cards or require you to disconnect cables unnecessarily to perform equipment maintenance or upgrades. • Install rack stabilizers (if available) before you mount the chassis. • Provide an adequate chassis ground (earth) connection for your router chassis. In addition to the preceding guidelines, review the precautions for avoiding excessive temperature conditions in the "Electrical Safety" section on page 5-21. Table 6-1 provides the Cisco ASR 1006 Router dimensions and weight information. Table 6-1 Cisco ASR 1006 Router Dimensions and Weight Cisco ASR 1006 Dimensions Depth 22.50 in. (57.15 cm) (including card handles, cable-management brackets, power supply handles) Height 10.45 in. (26.543 cm) - 6RU rack-mount per EIA RS-310 standard Width 17.25 in. (43.815 cm) - 19 inch rack-mount Weight 75 lb (34.019 kg) - fully configured Guidelines for an Equipment Shelf or Tabletop Installation The chassis should already be in the area where you will install it. If you have not determined where to install your chassis, see the "Cisco ASR 1000 Series Routers Component Overview" section on page 2-1 for information about site considerations. If you are not rack-mounting your Cisco ASR 1000 series chassis, place it on a sturdy equipment shelf or tabletop. When installing the Cisco ASR 1006 Router on an equipment shelf or tabletop, ensure that the surface is clean and that you have considered the following: • The Cisco ASR 1006 Router requires at least 3 inches (7.62 cm) of clearance at the inlet and exhaust vents (the front and top/rear sides of the chassis). • The Cisco ASR 1006 Router should be installed off the floor. Dust that accumulates on the floor is drawn into the interior of the router by the cooling fans. Excessive dust inside the router can cause overtemperature conditions and component failures. • There must be approximately 19 inches (48.3 cm) of clearance at the front and rear of the chassis to install and replace FRUs, or to access network cables and equipment. • The Cisco ASR 1006 Router needs adequate ventilation. Do not install it in an enclosed cabinet where ventilation is inadequate. OL-13208-09 Cisco ASR 1000 Series Aggregation Services Routers Hardware Installation Guide 6-7
-
 1
1 -
 2
2 -
 3
3 -
 4
4 -
 5
5 -
 6
6 -
 7
7 -
 8
8 -
 9
9 -
 10
10 -
 11
11 -
 12
12 -
13
-
14
-
15
-
16
-
17
-
18
-
19
-
20
-
21
-
22
-
23
-
24
-
25
-
26
-
27
-
28
-
29
-
30
-
31
-
32
-
33
-
34
-
35
-
36
 |
 |
