Compaq ProLiant 1000 Migrating to Microsoft Windows NT Server 4.0 on Compaq Se - Page 10
Windows NT 4.0 Set-Up Method
 |
View all Compaq ProLiant 1000 manuals
Add to My Manuals
Save this manual to your list of manuals |
Page 10 highlights
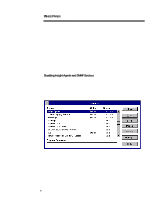
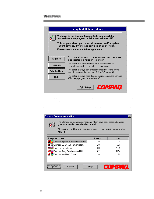
467A/0197 WHITE PAPER (cont.) ... Migration Scenario 1 Windows NT 4.0 Set-Up Method The following steps describe the process and when upgrading from an installation of Windows NT Server 3.51 CD from Compaq SmartStart (SSD 1.18B) on a Compaq ProLiant 5000 directly from the Windows NT 4.0 CD-ROM. TABLE 1 COMPAQ PROLIANT 5000 SERVER MIGRATION SCENARIO 1 CONFIGURATION System Processor(s) Memory Disk Controller Drive Configuration Network Controller Operating System Software Four 166-MHz Pentium Pro 128 MB Compaq SMART-2/P Controller Two 4-GB (RAID1) Compaq NetFlex-3 100 VG Controller Compaq SmartStart Windows NT Server 3.51, Windows NT Server 4.0 Windows NT SSD, version 1.19 and Compaq Insight Management Agents, version 3.10 or later 1. Backup your server completely, including the Registry. 2. Obtain the latest Compaq Support Software Disk (SSD 1.20 or higher). Obtain the latest SmartStart CD to obtain the latest Compaq Support utilities or consult the Compaq Web site (www.compaq.com). If you previously installed SNMP Service, disable it. See pages 6 - 7. If you previously installed the Compaq Insight Manager Agents, disable them. See pages 6 - 7. If you currently have the Compaq ProLiant Storage System installed, disable it. See pages 7 - 8. 3. You can choose from the following Windows NT 4.0 installation methods: − Direct CD-ROM install − Boot-up floppies NOTE: This scenario used the direct CD-ROM method. 4. Insert the Windows NT 4.0 CD into the CD-ROM drive. a) From the file manager, select the drive letter that represents the CD-ROM drive. b) Change to the i386 directory. Select File then select Run from the menu. c) Type: winnt32 /b (To create boot floppies, you would type winnt32 /ox in the same i386 directory.) 10
-
 1
1 -
2
-
3
-
4
-
 5
5 -
 6
6 -
 7
7 -
 8
8 -
 9
9 -
 10
10 -
 11
11 -
 12
12 -
 13
13 -
 14
14 -
 15
15 -
16
-
17
-
18
-
19
-
20
-
21
-
22
-
23
-
24
-
25
 |
 |
