D-Link DCS-3420 Product Manual - Page 98
Using the Monitor Program
 |
UPC - 790069289811
View all D-Link DCS-3420 manuals
Add to My Manuals
Save this manual to your list of manuals |
Page 98 highlights
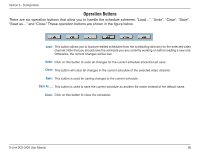
Section 3 - Configuration Using the Monitor Program This section depicts, in detail, how to manipulate the monitor tool. Connection of the DCS-3420 Once you have the privilege to connect to the DCS-3420, the cameras will automatically appear in the video area in the order they are connected. Once you have set up the camera in the video channel, the color of the channel number will turn green, indicating that the camera has been added to IP surveillance. If you do not set up the camera for the video channel, the color of the channel number will be gray. There is a unique light signal associated with each channel number. It indicates the status of the dedicated video channel, which is depicted as follows: Off: The video channel is not connected with any DCS-3420 yet. Green: The green light means the DCS-3420 associated with this channel number is connected, and the video is monitored in the video area. Red: The red light indicates the video from this channel is recording into the video database. In this mode, you don't have to drag and drop the channel to the video area. This means that this application software supports real-time recording with and without real-time monitoring for the dedicated video channel. Blink: With the motion detection mechanism set in the DCS-3420, the light of the corresponding channel will blink once the motion event is triggered. If you do not want to monitor one video, you can drag and drop the video (in the video area) to the trash can in the common control area of the monitor program. The following section will demonstrate the procedures for "drag and drop" step-by-step. D-Link DCS-3420 User Manual 98
-
 1
1 -
2
-
3
-
4
-
5
-
6
-
7
-
8
-
9
-
10
-
11
-
12
-
13
-
14
-
15
-
16
-
17
-
18
-
19
-
20
-
21
-
22
-
23
-
24
-
25
-
26
-
27
-
28
-
29
-
30
-
31
-
32
-
33
-
34
-
35
-
36
-
37
-
38
-
39
-
40
-
41
-
42
-
43
-
44
-
45
-
46
-
47
-
48
-
49
-
50
-
51
-
52
-
53
-
54
-
55
-
56
-
57
-
58
-
59
-
60
-
61
-
62
-
63
-
64
-
65
-
66
-
67
-
68
-
69
-
70
-
71
-
72
-
73
-
74
-
75
-
76
-
77
-
78
-
79
-
80
-
81
-
82
-
83
-
84
-
85
-
86
-
87
-
88
-
89
-
90
-
91
-
92
-
 93
93 -
 94
94 -
 95
95 -
 96
96 -
 97
97 -
 98
98 -
 99
99 -
 100
100 -
 101
101 -
 102
102 -
 103
103 -
104
-
105
-
106
-
107
-
108
-
109
-
110
-
111
-
112
-
113
-
114
-
115
-
116
-
117
-
118
-
119
-
120
-
121
-
122
-
123
-
124
-
125
-
126
-
127
-
128
-
129
-
130
-
131
-
132
-
133
-
134
-
135
-
136
-
137
-
138
-
139
-
140
-
141
-
142
-
143
-
144
-
145
-
146
-
147
-
148
-
149
 |
 |
