D-Link DSN-4200 Hardware Reference Guide for DSN-4000 - Page 22
Unpacking the DSN-4X00 Primary Array, Items Supplied by the User
 |
View all D-Link DSN-4200 manuals
Add to My Manuals
Save this manual to your list of manuals |
Page 22 highlights
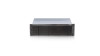
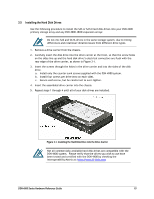
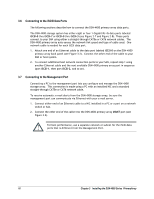
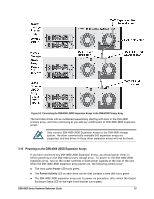
3.3 Unpacking the DSN-4X00 Primary Array After receiving the DSN-4X00 storage array, perform the following steps to ensure that the storage array and other contents arrived safely. 1. Inspect the outer shipping carton for any damage that may have occurred in shipping. Report any sign of damage to the appropriate shipping agency. 2. Remove the DSN-4X00 storage array and cables from the shipping carton. 3. Save the shipping container, foam, and antistatic bags in case you have to return the DSN-4X00 storage array. Returning the storage array in any other container is not recommended. 4. Check the contents against the items referenced on the packing list. If any item is missing or damaged, notify a sales representative and/or the shipping agency. 3.4 Items Supplied by the User Table 3-1 lists the additional items you must supply to install the DSN-4X00 storage array. All users must provide the items in the first row of Table 3-1. Rack-mount users must provide the additional items shown. Table 3-1. User-Supplied Items for Installing the DSN-4X00 Primary Array User Category All Users User-Supplied Items A PC with a Network Interface Card (NIC) that will act as the iSCSI initiator. (See Note 1) A PC with a NIC and Internet access that will access the management console. (See Note 1) Two available AC outlets not controlled by a wall switch, preferably on different circuits. An IP address for each DSN-4X00 host connection data port that will connect to your SAN. An Ethernet cable for each DSN-4X00 primary array host connection RJ-45 data port that will connect to your SAN (the primary array will auto-detect the network link speed and type of cable used). An Ethernet switch and Ethernet cables are optional. If you want to use the DSN-4X00 storage array's Link Aggregation feature, the network switch must support LAGs. SAS or SATA Hard Disk Drives Rack-Mount Users A standard NEMA-compliant 19-inch rack. Additional mounting hardware for specific rack being used, if necessary. Note 1: For convenience, one PC with three installed NICs can be used instead of separate PCs. In this configuration, one NIC connects to the DSN-4X00 storage array's Management Port, a second NIC connects to the Internet, and a third NIC is used with the iSCSI initiator. 14 Chapter 3 Installing the DSN-4000 Series PrimaryArray
-
 1
1 -
2
-
3
-
4
-
5
-
6
-
7
-
8
-
9
-
10
-
11
-
12
-
13
-
14
-
15
-
16
-
 17
17 -
 18
18 -
 19
19 -
 20
20 -
 21
21 -
 22
22 -
 23
23 -
 24
24 -
 25
25 -
 26
26 -
 27
27 -
28
-
29
-
30
-
31
-
32
-
33
-
34
-
35
-
36
-
37
-
38
 |
 |
