D-Link DSN-4200 Hardware Reference Guide for DSN-4000 - Page 23
Installing the Hard Disk Drives
 |
View all D-Link DSN-4200 manuals
Add to My Manuals
Save this manual to your list of manuals |
Page 23 highlights
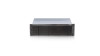
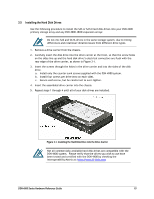
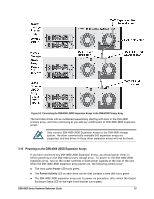
3.5 Installing the Hard Disk Drives Use the following procedure to install the SAS or SATA hard disk drives into your DSN-4X00 primary storage array and any DSN-4000 JBOD expansion arrays: Do not mix SAS and SATA drives in the same storage system, due to timing differences and rotational vibration issues from different drive types. 1. Remove a drive carrier from the chassis. 2. Carefully insert the disk drive into the drive carrier at the front, so that the screw holes on the sides line up and the hard disk drive's electrical connectors are flush with the rear edge of the drive carrier, as shown in Figure 3-1. 3. Insert the screws through the holes in the drive carrier and into the sides of the disk drive. a. Install only the counter-sunk screws supplied with the DSN-4X00 system. b. Install four screws per drive (two on each side). c. Secure each screw, but be careful not to over-tighten. 4. Insert the assembled drive carrier into the chassis. 5. Repeat steps 1 through 4 until all of your disk drives are installed. Figure 3-1. Installing the Hard Disk Drive into the Drive Carrier Not all commercially-available hard disk drives are compatible with the DSN-4X00 system. Please verify that the drives you wish to use have been tested and certified with the DSN-4X00 by checking the Interoperability Matrix at: http://www.D-Link.com DSN-4000 Series Hardware Reference Guide 15
-
 1
1 -
2
-
3
-
4
-
5
-
6
-
7
-
8
-
9
-
10
-
11
-
12
-
13
-
14
-
15
-
16
-
17
-
 18
18 -
 19
19 -
 20
20 -
 21
21 -
 22
22 -
 23
23 -
 24
24 -
 25
25 -
 26
26 -
 27
27 -
 28
28 -
29
-
30
-
31
-
32
-
33
-
34
-
35
-
36
-
37
-
38
 |
 |