D-Link DSN-4200 Hardware Reference Guide for DSN-4000 - Page 37
Appendix B, Installing the System in a Rack
 |
View all D-Link DSN-4200 manuals
Add to My Manuals
Save this manual to your list of manuals |
Page 37 highlights
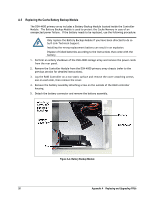
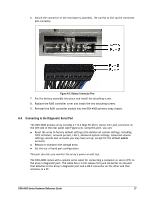
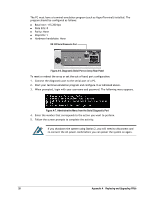
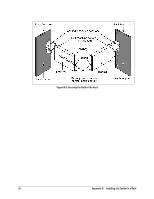
Appendix B Installing the System in a Rack This appendix describes how to install the DSN-4000 series array in a rack. At least two persons are required to safely lift, place, and attach the DSN4000 series array system into a rack. Do not lift or move the DSN-4000 series storage system by the handles, power supply or the Controller Module. Instead, hold the complete system itself. Be sure all switches are OFF before installing the DSN-4000 series storage system or replacing any components. To install the DSN-4000 series storage system into a rack: 1. Select the locations in the rack where you will be installing the rails that will support the primary array and any expansion arrays (if appropriate). When selecting a location, note the location of the three mounting holes on the rack's front vertical supports and the two mounting holes on the back vertical supports, as shown in the following figure. These locations will become important when you secure the rails and the array to the rack. Figure B-1. Example of Mounting Hole Locations on the Front Rails 2. Check the fit of the mounting rails in your rack system. 3. Adjust the length of the mounting rails as needed. 4. Attach the mounting rail assemblies to the outside of the rack posts, using the attaching screws from your rack system. Be sure the support is on the bottom facing inward. 5. Square the rail assemblies in the rack. 6. Tighten the adjustment screws and the attaching screws. 7. Place the DSN-4000 series storage system onto the rails. 8. Secure the DSN-4X00 storage system to the rack through each handle, using the attaching screws from your rack system. DSN-4000 Series Hardware Reference Guide 29
-
 1
1 -
2
-
3
-
4
-
5
-
6
-
7
-
8
-
9
-
10
-
11
-
12
-
13
-
14
-
15
-
16
-
17
-
18
-
19
-
20
-
21
-
22
-
23
-
24
-
25
-
26
-
27
-
28
-
29
-
30
-
31
-
 32
32 -
 33
33 -
 34
34 -
 35
35 -
 36
36 -
 37
37 -
 38
38
 |
 |
