D-Link DSN-4200 Hardware Reference Guide for DSN-4000 - Page 24
Connecting to the iSCSI Data Ports, Connecting to the Management Port
 |
View all D-Link DSN-4200 manuals
Add to My Manuals
Save this manual to your list of manuals |
Page 24 highlights
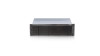
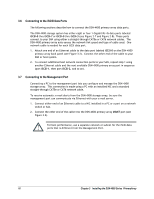
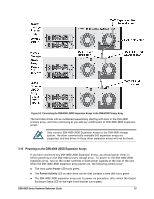
3.6 Connecting to the iSCSI Data Ports The following sections describe how to connect the DSN-4X00 primary array data ports. The DSN-4X00 storage system has either eight or four 1-Gigabit RJ-45 data ports labeled iSCSI-0 thru iSCSI-7 or iSCSI-0 thru iSCSI-3 (see Figure 2-7 and Figure 2-8). These ports connect to your SAN using either a straight-through CAT5e or CAT6 network cables. The DSN-4X00 primary array auto-senses the network link speed and type of cable used. One network cable is needed for each iSCSI data port. 1. Attach one end of an Ethernet cable to the data port labeled iSCSI-0 on the DSN-4X00 primary array back panel (see Figure 3-2). Connect the other end of the cable to your SAN or host system. 2. To connect additional host network connection ports to your SAN, repeat step 1 using another Ethernet cable and the next available DSN-4X00 primary array port in sequence (port iSCSI-1, then port iSCSI-2, and so on). 3.7 Connecting to the Management Port Connecting a PC to the management port lets you configure and manage the DSN-4X00 storage array. This connection is made using a PC with an installed NIC and a standard straight-through CAT5e or CAT6 network cable. To receive automatic e-mail alerts from the DSN-4X00 storage array, be sure the management port can communicate via Ethernet with your e-mail server. 1. Connect either end of an Ethernet cable to a NIC installed in a PC or a port on a network switch or hub. 2. Connect the other end of the cable into the DSN-4X00 primary array MGMT port (see Figure 3-2). For best performance, use a separate network or subnet for the iSCSI data ports that is different from the Management Port. 16 Chapter 3 Installing the DSN-4000 Series PrimaryArray
-
 1
1 -
2
-
3
-
4
-
5
-
6
-
7
-
8
-
9
-
10
-
11
-
12
-
13
-
14
-
15
-
16
-
17
-
18
-
 19
19 -
 20
20 -
 21
21 -
 22
22 -
 23
23 -
 24
24 -
 25
25 -
 26
26 -
 27
27 -
 28
28 -
 29
29 -
30
-
31
-
32
-
33
-
34
-
35
-
36
-
37
-
38
 |
 |