D-Link DSN-4200 Hardware Reference Guide for DSN-4000 - Page 28
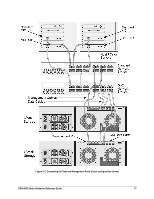
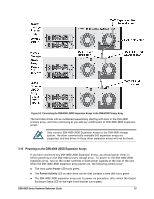
Powering-on the DSN-4X00 Storage Array, Hot-Plugging Additional DSN-4000 JBOD Expansion Arrays
 |
View all D-Link DSN-4200 manuals
Add to My Manuals
Save this manual to your list of manuals |
Page 28 highlights
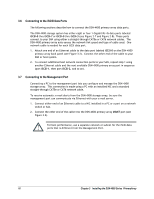
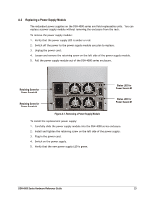
3.11 Powering-on the DSN-4X00 Storage Array To power-on the DSN-4X00 storage array, turn on the rocker switch on both power supplies at the rear of the unit. When the DSN-4X00 storage array powers-on, the following actions occur: The front panel Power LED turns green. The Power/Activity LED on each drive carrier that contains a hard disk turns green. The DSN-4X00 storage array runs its power-on procedure (up to 5 minutes), after which the Global Enclosure Status LED on the right front bracket turns green. After the DSN-4X00 storage array powers-on for the first time, it loads the default settings and guides you through the Startup Wizard, which is a web-based application that is accessible through the default IP address of 192.168.1.1. The Startup Wizard allows you to change the default settings so you can access the DSN-4X00 system on your network. You can then use the Management Center software to create volumes and change other system settings. For a description of the factory-default configuration settings and how to change them, refer to the xStack Storage Software User's Guide. The very first time that you power-on the DSN-4X00 primary array, the battery may not be fully charged. While the battery is still charging, the write-cache mode will be set to "Write-Thru", which results in slower data transfer performance. The write-cache mode will automatically change to "Write-Back" after the battery has become fully charged, which will usually happen within 6 hours, depending on how much charging the battery needs. 3.12 Hot-Plugging Additional DSN-4000 JBOD Expansion Arrays It is possible to hot-plug additional DSN-4000 JBOD expansion arrays to add new storage capacity after the system has already been running. However, you must only add an expansion array to the last SAS OUT expansion port in the chain of existing DSN-4X00 primary and DSN-4000 JBOD arrays. The newly added hard disk drives will be numbered sequentially after the existing drives, and those drives will be initialized automatically (unless they had been previously used in another D-Link array, in which case you will need to manually initialize those drives). To avoid possible loss of data, do not disconnect any of the DSN-4000 JBOD expansion arrays from the primary array while the system is running. 20 Chapter 3 Installing the DSN-4000 Series PrimaryArray
-
 1
1 -
2
-
3
-
4
-
5
-
6
-
7
-
8
-
9
-
10
-
11
-
12
-
13
-
14
-
15
-
16
-
17
-
18
-
19
-
20
-
21
-
22
-
 23
23 -
 24
24 -
 25
25 -
 26
26 -
 27
27 -
 28
28 -
 29
29 -
 30
30 -
 31
31 -
 32
32 -
 33
33 -
34
-
35
-
36
-
37
-
38
 |
 |